Stand: 02 Oct 2021
Leap motion is a small and cheap sensor that can detect and track your hands, thus allowing to create gesture-based interfaces. It gives you the position of various interesting points (finger tips, finger joints, wrist etc.) of your hands in 3D. The pricing is only around 90 Euros in 2019.
Consider the software framework Wekinator when implementing gesture-based interaction.
Here's an interesting article on gesture-based interaction: Why Gesture is the Next Big Thing in Design (25 Jan 2018)
You can find most of the code in this chapter on GitHub.
2.1 Gesture-based Interaction
The leap motion is the perfect tool to explore gesture-based or in-air interaction. Gestural interaction can exploit the full range of 3D motion that a hand can perform (translation and rotation). Additionally, the fingers can be used distinguish various "modes", e.g. with different hand shapes (fist vs. spread fingers), or they can perform actions themselves (e.g. pinching). Think about how limited a mouse input is in comparison.
2.1.1 Challenges
However, while the space of possibilities is large, there are various problems that everyone soon discovers who wants to design a gestural interface:
- Fatigue: Since the hands must be held in the air, the interaction can become uncomfortable over time. This is sometimes called the Gorilla Arm Problem.
- Clutch: Hands are used for various everyday actions, from scratching one's head to grabbing a coffee cup. In interaction one needs to distinguish between "meaningful" hand movement and other kinds of motion. This can be achieved e.g. with a certain hand shape (e.g. fist or pinch) which signals that now the movement is meaningful, similar to a clutch in a car. Think of dragging a desktop icon with your mouse. Here, your mouse button is the clutch.
- No Button: A related problem is the fact that there is nothing like a mouse button. Let's say your interface lets the user control a cursor and there are various buttons on your screen. How does the user trigger a button? Triggering buttons by just touching them may lead to many unintentional button presses. There are several workarounds:
- Make a gesture: Let the user tap in the air or make a pinch gesture to trigger. This is sometimes problematic because while performing the gesture the hand changes position and may leave the button area.
- Add a real button: Give the user a device with a button or let the user trigger a real button or key with the second hand.
- Timeout buttons: Trigger the button if the user hovers on the button for a specific amount of time (e.g. 1 second). It is good practice to visualize the time that remains before the button is triggered in some kind of progress bar. The drawback of this method is that you lose time.
- Social Awkwardness: People usually feel awkward when they have to gesture (especially to a machine) in front of other people.
- Low Precision: Due to multiple factors gestural input can be imprecise. The recognition technology which usually has both jitter and latency is one limiting factor. The other is the clutch or trigger movement (making a gesture like pinch or fist - or pushing a button on a controller) which may compromise the position of the hand/finger at this critical point.
2.1.2 Student Projects
On the other hand, there are many opportunities for novel interaction techniques. Check out some of the student projects using the leap motion (there are several more):
- LeapSketch: Sketching in-air with your hand
- LeapWalking: Gesture-based Walking
- Gesture-based Picture Editor
- AirEdit: Gestures for text processing
- FinGym: Do finger gymnastics with music
- Winged: Desktop window management by gesture
- LeapCopter: Flight simulation with hand gestures for quadcopters
Here, we will discuss how to connect with a leap motion device via Processing 3 and via Java.
2.2 Leap motion with Processing
First of all, you need to install the Leap motion driver for Windows or Mac. Find the "V2 software" on the setup page (for some reason it is a very small link). After download, run the software to install the leap motion on your system.
Second, start Processing 3 and add the library "Leap Motion for Processing" (Author: Darius Morawiec) in the menu Sketch > import library > add library..
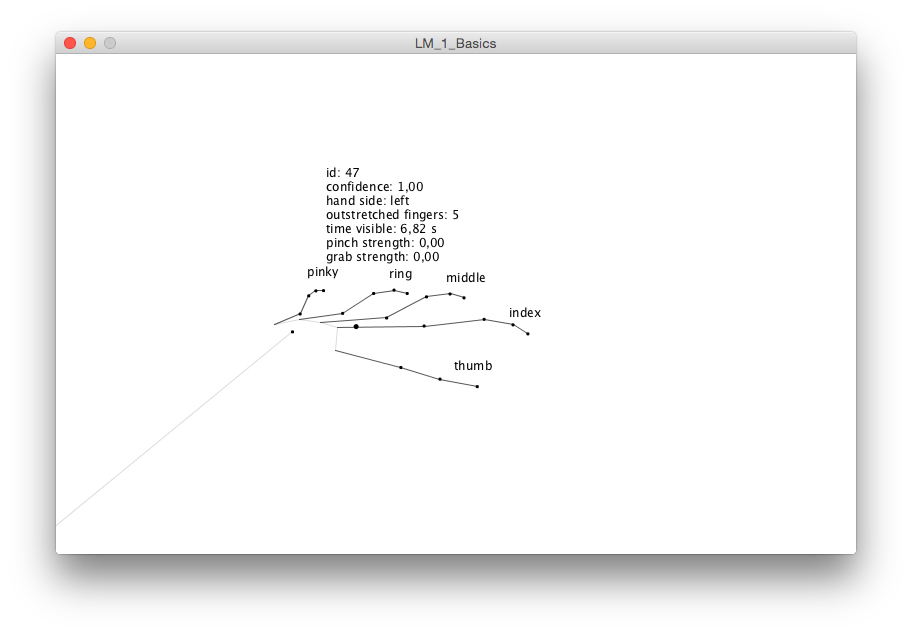
Under File > Examples.. you can look into Contributed Libraries > Leap Motion for Processing and open the sketch "LM_1_Basics". If your leap motion is connected you should see a screen similar to the screenshot at the beginning of this page.
You can simply look into the code of "LM_1_Basics" to understand how to access the hand/finger data. There is also a documentation by the author on GitHub: https://github.com/nok/leap-motion-processing.
The most important external link is the Java API Overview by leap motion which also applies to the use with Processing.
In the following we will look a bit deeper into how to use the library.
2.2.1 LeapMotion Object
To use the leap motion, you import the library in the first line and create an object of type LeapMotion:
import de.voidplus.leapmotion.*;
LeapMotion leap;

void setup() {
  size(800, 500, OPENGL);
  leap = new LeapMotion(this);
}
There are a number of callback functions that you can use, e.g. if you need to do something when the leap motion is first initialiazed.
void leapOnInit() {
  // println("Leap Motion Init");
}
void leapOnConnect() {
  println("Leap Motion Connect");
}
void leapOnFrame() {
  // println("Leap Motion Frame");
}
void leapOnDisconnect() {
  // println("Leap Motion Disconnect");
}
void leapOnExit() {
  // println("Leap Motion Exit");
}
2.2.2 Hands and fingers and coordinate system
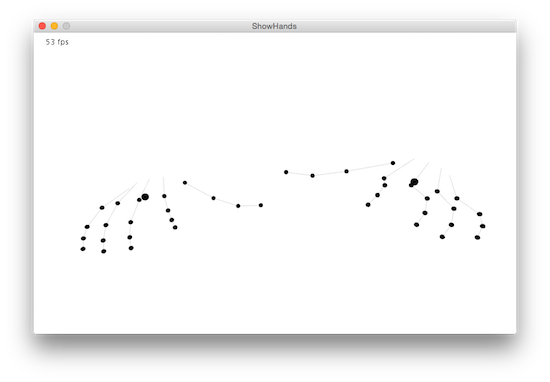
Hands and fingers are represented in objects. There is also an in-built drawing routine for showing hands. Here is a base program to draw the hands:
import de.voidplus.leapmotion.*;

LeapMotion leap;

void setup() {
  size(800, 500, OPENGL);
  leap = new LeapMotion(this);
}

void draw() {
  background(255);
  int fps = leap.getFrameRate();
  text(fps + " fps", 20, 20);

  for (Hand hand : leap.getHands ()) {
    hand.draw();
  }
}
Usually, you want to use the tip of the index finger to navigate a cursor or manipulate objects. The object of type Hand contains various objects of type Finger. You can obtain the index finger with getIndexFinger(). Then, you can get the absolute position of the index finger tip.
import de.voidplus.leapmotion.*;

LeapMotion leap;

void setup() {
  size(800, 500, OPENGL);
  leap = new LeapMotion(this);
}

void draw() {
  background(255);
  for (Hand hand : leap.getHands ()) {
    PVector indexTip = hand.getIndexFinger().getRawPositionOfJointTip();

    text("x: " + nf(indexTip.x, 0, 1), 20, 40);
    text("y: " + nf(indexTip.y, 0, 1), 20, 60);
    text("z: " + nf(indexTip.z, 0, 1), 20, 80);

    hand.draw();
  }
}
The coordinates refer to the following system which is centered on the leap motion device (the actual numbers are given in millimeters):

Source: Leap Motion API Overview
Check out leap motion's documention on the leap motion coordinate system which also shows you how to map positions from input space to your desired control space.
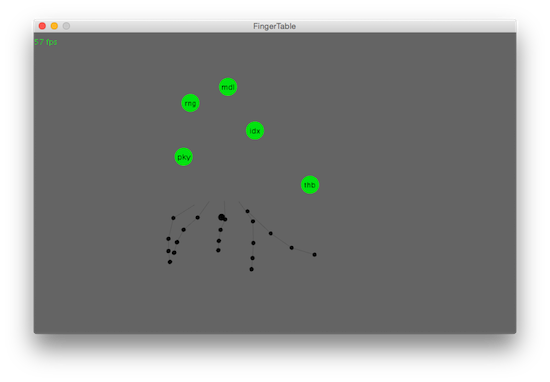
Imagine the leap motion is positioned on a table and our fingers would appear as shadows on this table. In this case we would only be interested in the (x, z) coordinates and could show this directly on our 2D screen.
You can find this code on GitHub.
import de.voidplus.leapmotion.*;

float INTERACTION_SPACE_WIDTH = 200; // left-right from user
float INTERACTION_SPACE_DEPTH = 150; // away-and-toward user
float FINGER_DOT = 30;

LeapMotion leap;

void setup() {
  size(800, 500, OPENGL);
  leap = new LeapMotion(this);
  textAlign(CENTER);
}

void draw() {
  background(100);

  // FPS
  int fps = leap.getFrameRate();
  fill(#00E310);
  text(fps + " fps", 20, 20);

  for (Hand hand : leap.getHands ()) {

    PVector thumbTip = hand.getThumb().getRawPositionOfJointTip();
    PVector indexTip = hand.getIndexFinger().getRawPositionOfJointTip();
    PVector ringTip = hand.getRingFinger().getRawPositionOfJointTip();
    PVector middleTip = hand.getMiddleFinger().
                        getRawPositionOfJointTip();
    PVector pinkyTip = hand.getPinkyFinger().getRawPositionOfJointTip();

    handleFinger(thumbTip, "thb");
    handleFinger(indexTip, "idx");
    handleFinger(middleTip, "mdl");
    handleFinger(ringTip, "rng");
    handleFinger(pinkyTip, "pky");

    hand.draw();
  }
}

void handleFinger(PVector pos, String id) {

  // map finger tip position to 2D surface
  float x = map(pos.x, -INTERACTION_SPACE_WIDTH,
  INTERACTION_SPACE_WIDTH, 0, width);
  float y = map(pos.z, -INTERACTION_SPACE_DEPTH,
  INTERACTION_SPACE_DEPTH, 0, height);

  fill(#00E310);
  noStroke();
  ellipse(x, y, FINGER_DOT, FINGER_DOT);

  // ID
  fill(0);
  text(id, x, y + 5);
}
2.2.3 Recognizing Poses
To distinguish between actions you need to recognize certain hand poses (e.g. outstretched index finger, victory sign, fist etc.) In this section you will see examples which will give you some ideas about recognizing poses. The most important aspects for recognizing poses are distances between finger tips and angles between fingers.
In the following code snippets we assume the code of the last section where we have the varible hand with an object of type Hand and also the variables for indexTip and so on.
Hand orientation
You could be interested in the orientation of the hand, i.e. if the hand is pointing upward or if it is pointing forward but tilted toward the left etc.
For this we can acquire the three angles pitch, roll and yaw:
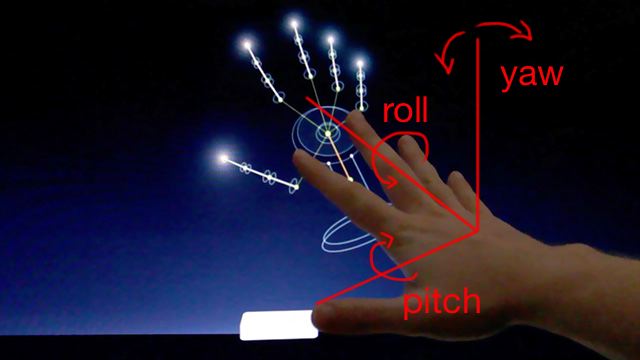
Simply paste the following code in and try around a bit. Take note that angles are returned in degrees (not radians):
println("pitch ", hand.getPitch(), " roll ", hand.getRoll(), " yaw ", hand.getYaw());Fingers
The number of outstreteched fingers may be relevant (e.g. to recognize the "spread hand"):
int numOut = hand.getOutstretchedFingers().size();When putting thumb and index finger together this is called the pinch pose (or gesture). Pinching is often used like a mouse button, e.g. to drag an object or to "grab" the map in navigation. This function is also called a clutch gesture. Obviously this can be done by measuring the distance between thumb and index finger.
float distIndexThumb = indexTip.dist(thumbTip);However, there is the convenient method getPinchStrength() which returns a value in [0, 1] where 1 indicates a pinch pose:
float pinch = hand.getPinchStrength();Sometimes, it is more appropriate to grab with all five fingers. This is correlated with the distance between all fingers (e.g. measuring the mean distance from the centroid of all finger tips). Again, we have the convenient method getGrabStrength() giving us a value in [0, 1] with 1 being a perfect grab pose.
float grab = hand.getGrabStrength();If you want to recognize the victory sign, i.e. the index and middle finger being outspread, you can measure the angle between fingers. For this you need the direction of the fingers and compute the angle in-between. For the direction you look at a finger joint closer to the root of the finger, the so-called metacarpel joint:
PVector indexMcp = hand.getIndexFinger().getRawPositionOfJointMcp();
PVector middleMcp = hand.getMiddleFinger().getRawPositionOfJointMcp();
Now you can compute the direction of the fingers:
PVector indexDir = PVector.sub(indexTip, indexMcp);
PVector middleDir = PVector.sub(middleTip, middleMcp);
And take the angle between the two:
float a = degrees(PVector.angleBetween(indexDir, middleDir));2.2.4 Recognizing Gestures
For recognizing gestures (e.g. swiping, tapping or circling) you usually assume a certain pose in combination with a certain motion. Motion can be detected by measuring speed, velocity (speed + direction) or acceleration. More complex gestures need the recognition of a path of motion.
Also consider a restriction in terms of where gestures are allowed (defining certain interaction zones) to avoid accidental triggering of events.
Hand velocity
Remember that the velocity is the vector of movement. Its length (magnitude) is the speed of the motion. We measure e.g. the veloctiy of the hand by looking at the its positions over time.
Let's assume we track only one hand. We record hand positions as vectors in an array (we chose to consider only 10 vectors):
PVector[] handPositions = new PVector[10];
int handPosIndex = 0;
In draw() we continually record hand positions - more precisely, the palm position - using an array.
handPositions[handPosIndex++] = hand.getPalmPosition();
handPosIndex = handPosIndex % handPositions.length;
The array acts like a circular buffer. It overwrites data once the array is full.
Now we can compute the acceleration between the current position and the position the has been recorded 9 frames ago. The if condition ensures that we have filled up our array once before we start our computation (otherwise we would run into a NullPointerException):
if (handPositions[handPositions.length-1] != null) {
  PVector currentPos = handPositions[handPosIndex == 0 ? handPositions.length-1 : handPosIndex-1];
  PVector prevPos = handPositions[handPosIndex];
  PVector handVelocity = PVector.sub(currentPos, prevPos);
  println("hand speed ", handVelocity.mag(), " velocity ", handVelocity);
}
You can now use a certain speed to trigger an action. You can use this in conjunction with a certain movement direction (e.g. sideways) and pose (e.g. open hand) to recognize a gesture like the swipe gesture.
Pinch gesture
You may want to use pinching as a gesture. For instance, you want to "grab" and map and "drag" it with your fingers until you "release" it. This is equivalent to pressing and holding a mouse button (called dragging). In this section, we show you how to do this.
First, you introduce a pinching state as a global variable:
boolean isPinching = false;Now you can call so-called listener functions in your draw() cycle. We use a threshold of .8 pinch strength to trigger a pinch gesture. You may have to tune this for your needs:
if (isPinching) {
  if (hand.getPinchStrength() < .8 ) {
    pinchReleased();
    isPinching = false;
  } else {
    pinchMoved(indexTip);
  }
} else {
  if (hand.getPinchStrength() > .8 ) {
    pinchStarted();
    isPinching = true;
  }
}
For your code to run, you have to define the three listener functions. We simply output some tracing info:
void pinchStarted() {
  println("pinch started");
}

void pinchMoved(PVector posIndexTip) {
  println("pinch moved: " + posIndexTip);
}

void pinchReleased() {
  println("pinch released");
}
Now you can use the pinch gesture in a similar fashion as the mouse functions mousePressed, mouseReleased and mouseDragged.
2.2.5 Timeout Buttons
You can find this code on GitHub.
Since your fingers cannot easily trigger a "press event" (like a mouse button), you need a different mechanism to trigger a button. One option is to trigger a button only if a certain time has passed while the finger hovers over it.
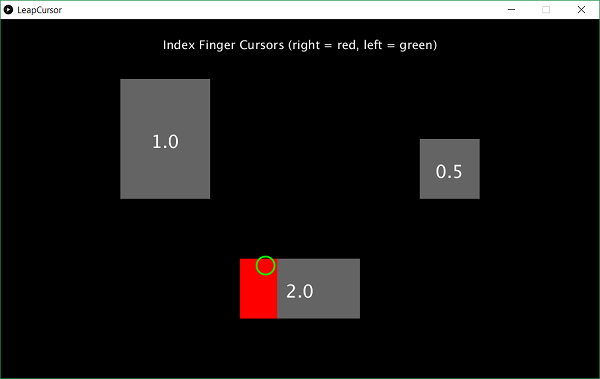
To display cursors at the tips of your fingers:
import de.voidplus.leapmotion.*;

LeapMotion leap;
ArrayList<TimeoutButton> buttons = new ArrayList<TimeoutButton>();
ArrayList<PVector> cursors = new ArrayList<PVector>();

void setup() {
  size(1000, 600);
  leap = new LeapMotion(this);
  buttons.add(new TimeoutButton(200, 100, 150, 200, 1));
  buttons.add(new TimeoutButton(400, 400, 200, 100, 2));
  buttons.add(new TimeoutButton(700, 200, 100, 100, .5));
}

void draw() {
  background(0);
  cursors.clear();

  // handle buttons
  for (TimeoutButton b : buttons) {
    b.render();
  }

  strokeWeight(3);
  noFill();
  for (Hand hand : leap.getHands()) {
    Finger index = hand.getIndexFinger();
    PVector pos = index.getPosition();
    if (hand.isRight()) {
      stroke(255, 0, 0);
    } else {
      stroke(0, 255, 0);
    }
    ellipse(pos.x, pos.y, 30, 30);
    cursors.add(pos);
  }

  for (TimeoutButton b : buttons) {
    b.update(cursors);
  }
  fill(255);
  textSize(20);
  textAlign(CENTER);
  text("Index Finger Cursors (right = red, left = green)", width/2, 50);
}
Here is the code for the timeout (dwell) buttons. Note that two cursors can be active. It is only important that one of them (no matter which one) is hovering over the button for triggering it.
class TimeoutButton {
  int x;
  int y;
  int w;
  int h;
  float timeout;

  boolean inside;
  int startFrame;
  int showPress = 0;
  float secInside = -1;

  TimeoutButton(int x, int y, int w, int h, float timeout) {
    this.x = x;
    this.y = y;
    this.w = w;
    this.h = h;
    this.timeout = timeout;
  }

  void render() {

    // white after pressed
    if (showPress > 0) {
      fill(255);
      showPress--;
    } else {
      fill(100);
    }
    noStroke();
    rect(x, y, w, h);

    // show progress in red
    if (secInside > 0 && showPress <= 0) {
      fill(255, 0, 0);
      rect(x, y, secInside/timeout * w, h);
    }

    fill(255);
    textAlign(CENTER);
    textSize(30);
    text(""+timeout, x + w/2, y + h/2 + 15);
  }

  boolean oneIsIn(ArrayList<PVector> points) {
    for (PVector v : points) {
      if (v.x >= x && v.x <= x + w && v.y >= y && v.y <= y + h) {
        return true;
      }
    }
    return false;
  }

  void update(ArrayList<PVector> cursors) {
    if (oneIsIn(cursors)) {
      if (inside) {
        secInside = (float(frameCount - startFrame)) / frameRate;
        if (secInside > timeout) {
          startFrame = frameCount;
          pressed();
        }
      } else {
        inside = true;
        startFrame = frameCount;
      }
    } else {
      inside = false;
      secInside = -1;
    }
  }

  void pressed() {
    showPress = 10;
    secInside = -1;
  }
}
2.3 In-built Gesture Recognition
Until now we only looked at coordinates which can be used e.g. to navigate a cursor with a finger tip. However, we often need to recognize certain gestures, e.g. a "swipe" or a circling motion. We showed you how to implement this yourself.
However, the leap motion has an in-built gesture recognizer which can recognize the following gestures:
- Swipe
- Circle
- Screen Tap (tapping against an imaginary vertical surface)
- Key Tap (tapping against an imaginary horizontal surface)
We always recommend to consider implementing gestures yourself using the raw data from the leap motion. This way to can fine-tune your recognition e.g. by imposing further restrictions and side-conditions.
The following illustrations are straight from the Leap Motion API Overview.
Swipe:

Circle:

Screen Tap:

Key Tap:

Eine Demo-Programm finden Sie unter den Examples (e2_gestures).
2.4 Processing Class Documentation (API)
You can a complete API documentation of the classes (e.g. Hand and Finger) on your hard disk. In Processing, select Help > Libraries Reference > Leap Motion for Processing. Or find it directly on your hard drive in your sketchbook folder unter libraries > LeapMotionForProcessing > reference. Just open index.html there.
Be careful with googling the class documentation. There are several outdated websites out there.
2.5 Leap Motion with Java
Download the software development kit V2 Tracking SDK from the leap motion website. Unfortunately, you have to create an account with the company first.
You need to run the installer to install the driver (for Mac this is the .dmg file). For your Java project you need to copy the LeapJava.jar file into your project directory (typically in a subdirectory called lib) and register this library in the properties settings.
Finally, you need to copy the binaries (for Mac these are the two .dylib files, for Windows the .dll files) to a directory of your choice and add this option to the run line of your Java application
-Djava.library.path=yourpathNow look at the sample program under /samples to see how to obtain the signal data.
Also see the article Leap Motion and JavaFX by Johan Vos, Oracle, 2014.