Last update: 22 Sep 2022
Also see my blog post about the new Kinect Azure (Kinect v3).
The Kinect is a camera system which allows to recognize and track a human body and outputs data points in the form of a "skeleton" which is a number of connected joints. The Kinect integrates both infrared emitters and infrared cameras together with a software package to perform this task.
Recently, the capabilities of the Kinect can often be achieved with a simple webcam in conjunction with powerful software, usually with the help of machine learning. To learn about such Kinect alternatives, have a look into the chapter Vision-based Interaction.
For implementing gestural interaction, consider the software Wekinator.
1.1 Introduction
Dieses Kapitel beschäftigt sich mit der Programmierung der Kinect in Processing unter Windows oder Mac OS.
Die wichtigsten Code-Teile finden Sie auf GitHub
- für die Kinect v1 unter Kinect1Processing
- für die Kinect v2 unter Kinect2Processing
1.1.1 Student Projects
To see some of the possibilies of designing interaction with the Kinect, have a look at some Kinect-based projects in my Interaction Engineering course:
- Endless Runner: Jump'n Run game projected on the floor
- Who Am I: Interaction in a museum
- TrampTroller: A Trampoline controller
- NINGU: The Ninja Way of presenting slides
- Occlusion-Aware Presenter: A solution for the occulusion problem when presenting
- KinectScroll: Gesture-based scrolling
1.1.2 Links und Alternativen
- Interessanter Artikel zum Thema Gesteninteraktion: Why Gesture is the Next Big Thing in Design (25 Jan 2018)
- Kinectron ist ein Projekt, um Daten der Kinect 2 (auch von mehreren Kinects gleichzeitig) in den Browser zu bekommen; dabei wird mit JavaScript gearbeitet
- Für Java gibt es die Library J4K der University of Florida.
- Für C# unter Windows gibt es das Visual Studio, wobei Visual Studio 2017 nicht zu funktionieren scheint. Ein Artikel zu Kinect mit Visual Studio 2015 unter Windows 10 gibt aber an, dass die Version 2015 noch mit der Kinect läuft (siehe auch Kinect for Windows).
1.2 Über die Kinect(s)
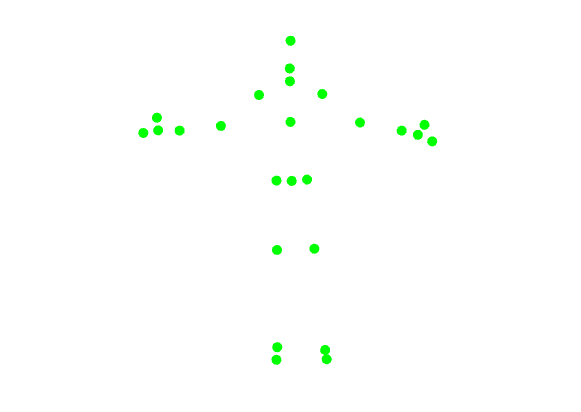
Der Kinect-Sensor erlaubt es, einen menschlichen Körper in seiner Grundstruktur - als Skelett - im 3D-Raum zu erfassen und z.B. zur Gestensteuerung zu verwenden. Das Kinect-Gerät wirft mit einem Infrarot-Strahler ein Muster in den Raum und beobachtet dieses Muster mit zwei IR-Kameras. Anhand der Verzerrung und der relativen Abweichung der zwei Bilder berechnet die Kinect ein Tiefenbild. Aus dem Tiefenbild wird dann errechnet, ob und wo sich menschliche Körper, insbesondere die Gelenke (engl. joints), befinden.
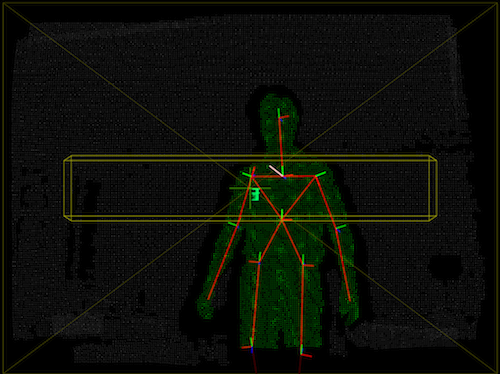
Auf dem folgenden Bild bekommen Sie einen Eindruck dessen, was die Kinect an Daten liefern kann.
1.2.1 Zwei Versionen
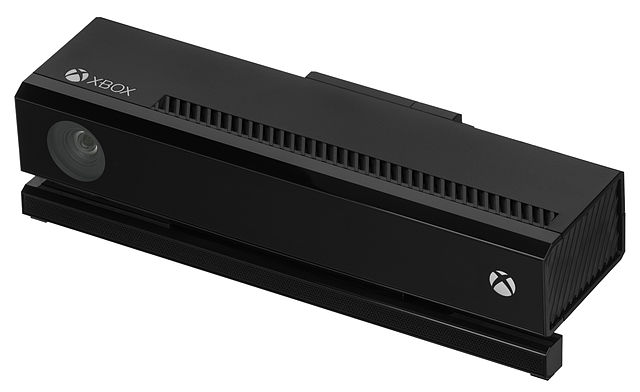
Die Kinect wurde von Microsoft für die Spielekonsole Xbox 360 entwickelt und 2010 herausgegeben. Wir nennen diese erste Kinect hier Kinect 1. Es können zwei Kinects an einem Rechner betrieben werden, sofern zwei verschiedene USB-Controller verbaut sind.
Seit 2013 gibt es eine neue Version, die Kinect One. Sie wird im Internet auch Kinect 2 oder Kinect v2 genannt. Wichtiger technischer Unterschied: Kinect 2 benötigt einen USB 3.0 Anschluss und es können nicht zwei Kinects 2 an einem Rechner betrieben werden.
1.2.2 Unterschiede: Kinect 1 und Kinect 2
Daniel Shiffmann hat eine Auflistung der verschiedenen Kinect-Typen angefertigt, die ich hier kurz wiedergebe:
- Kinect 1: Die originale Serie nennt sich Modell 1414. Ein Update kam mit Modell 1473. Bei letzterem kann es zu Kompatibilitätsproblemen kommen. Den Modellnamen findet man auf der Unterseite des Fußes und auf einem Aufkleber auf der Schachtel. Der Modellname ist nicht die Seriennummer! Ein weiteres Update ist die Kinect for Windows 1. Auch hier ist Kompatibilität nicht immer gewährleistet.
- Kinect 2: Die neue Kinect, mit verändertem Aussehen (etwas größer und kastenförmiger), erweiterten Fähigkeiten (u.a. höhere Kameraauflösung, Gesichtserkennung, Erkennung von mehr Gelenkpunkten, weniger Interferenz zwischen 2 Kinects) und weitwinkligerem Objektiv (d.h. größerer Winkel für den Erfassungsbereich)
Hier eine Gegenüberstellung der technischen Daten (Quelle: Zugara):
| Kinect 1 | Kinect 2 | |
|---|---|---|
| RGB-Kamera | 640x480 @ 30fps | 1920x1080 @ 30fps |
| Tiefenbild | 320x240 | 512x424 |
| max. Distanz | ca. 4,5m | ca. 4,5m |
| min. Distanz | 40cm (near mode) | 50cm |
| hori. Winkel | 57° | 70° |
| vert. Winkel | 43° | 60° |
| Skelett | 20 joints | 26 joints |
| max. Anzahl Pers. | 2 | 6 |
| Neigungsmotor | Ja | Nein |
Ein weiterer wichtiger Unterschied ist, dass man für die Kinect 2 einen Rechner mit USB 3 Anschluss benötigt. Außerdem scheint es nicht möglich zu sein, mehrere Kinect 2 an einem Rechner zu betreiben (bei der Kinect 1 geht dies).
1.2.3 Verfügbarkeit
Leider wurde der Verkauf der Kinect 2017 eingestellt, d.h. dass auch für die Zukunft wohl irgendwann der Support auslaufen wird.
Die Kinect 1 wird nicht mehr hergestellt, aber es gibt eine Menge gebrauchter Exemplare im Umlauf. Man sollte darauf achten, dass die Kinect 1 einen USB-Anschluss hat, denn es gibt auch eine Version, die man nur an die XBox (eigener Stecker) anschließen kann.
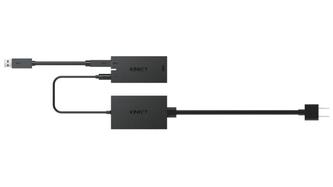
Die Kinect 2 ist noch im Handel für etwa 80 EUR (Stand 12/2017). Allerdings benötigt man unbedingt einen zusätzlichen Adapter (Netzteil und USB-Anschluss), der original ca. 60 EUR kostet und derzeit nicht lieferbar ist (siehe Abb. unten).
Beide Kinects sowie den Adapter kann man auch günstig auf eBay erwerben.
1.3 Kinect 2
Für den Betrieb der Kinect 2 muss Ihr Rechner einem USB 3 Anschluss haben (das neue USB-C mit Adapter funktioniert auch, USB 2 funktioniert definitiv nicht). Das Tracken von Skelettdaten (joints) ist leider nur unter Windows möglich. Für den Mac kann man aber die Rohdaten beziehen (Webcam, IR-Bild und - am interessantesten - das Tiefenbild).
1.3.1 Kinect 1+2 auf dem Mac
Mac-User verwenden die Library "Open Kinect for Processing" von Daniel Shiffman and Thomas Lengeling und lesen sich am besten das Kinect-Tutorial von Shiffman (Englisch) durch. Wie gesagt, bekommt man auf einem Mac derzeit nicht die Skelett-Daten.
Die genannte Library unterstützt sowohl die Kinect 1 als auch die Kinect 2.
1.3.2 Kinect 2 unter Windows
Stellen Sie sicher, dass Ihr Rechner einen USB 3 Anschluss hat.
Installieren Sie zunächst die Kinect SDK von Microsoft: Kinect for Windows SDK 2.0 . Nach der Installation können Sie Kinect Studio starten, um Ihre Kinect 2 zu testen.
Anschließend starten Sie Processing 3 und installieren die Library KinectPV2 von Thomas Lengeling wie gewohnt über Sketch > Library importieren ....
Wichtig (Stand: 12/2017) Der Code, der hier dargestellt ist, funktioniert derzeit nicht. Öffnen Sie stattdessen das Beispielprogramm "SkeletonColor", das mit der Library mitinstalliert wird.
Sie finden "SkeletonColor" unter Datei > Beispiele.. und in dem dann erscheinendem Fenster unter Contributed Libraries > Kinect v2 for Processing.
Auf der Webseite zu KinectPV2 finden Sie ein Demo-Video und eine Versionshistorie. In einem Tutorial auf Englisch zählt der Autor alle Möglichkeiten der Library mit Codebeispielen auf. Den Code der Library findet man auf der GitHub-Seite KinectPV2.
1.3.3 Überblick
Mit der Library lassen sich u.a. die folgenden Dinge tun:
- Kamerabilder erfassen
- Skeletterkennung
- Gesichtserkennung
Im folgenden wollen wir genauer darauf eingehen:
Kamerabilder erfassen
Die Kinect enthälgt eine normale Webcam (1080p) und eine Infrarot-Kamera (512x424 Pixel, 30 Hz). Die Bilder der Kameras kann man beziehen und darstellen.
Ebenso kann man auf das berechnete Tiefenbild zugreifen (512x424). Ein Tiefenbild (depth image) gibt auf jedem Pixel die "Tiefe" des Pixels an. Man kann sich vorstellen, dass von der Kamera aus für jeden Pixel ein Strahl nach außen geht und sobald der Strahl auf ein Hinternis trifft, wird dort die Tiefe gemessen. Ein Tiefenbild wird i.d.R. als Graustufenbild dargestellt. Je heller ein Pixel, umso näher das jeweilige Hindernis.
Skeletterkennung
Mit Skelett meint man in der Computergrafik eine Struktur aus Gelenkpunkten (engl. joints) und Knochen (engl. bones). Die Joints sind die wichtigere Information, da sich aus Position und Winkeln der Joints die Pose eines Menschen ergibt.
Skelette können unterschiedlich gebaut sein, mit mehr oder weniger Gelenkpunkten (zum Beispiel die Wirbelsäule mit 3 Punkten oder 15 Punkten). Die Kinect benutzt einen festgelegten Satz von 25 Gelenkpunkten.
Mit Skelett sind hier ausschließlich menschliche Skelette gemeint. Es können keine Tiere erfasst werden. Die Kinect versucht in jedem Tiefenbild ein oder mehr menschliche Skelette zu erkennen und die 25 Joints korrekt zu positionieren. Es können maximal 6 Skelette gleichzeitig erkannt und getrackt werden.
Zusätzlich wird auch rudimentär eine Handform erkannt: open, close und lasso. Die Zuverlässigkeit dieser Information hält sich in Grenzen.
Die Qualität der Erkennung hängt ganz massiv von der Position des Benutzers relativ zur Kinect ab. Zunächst muss der Benutzer im Erfassungsbereich (capture volume) der Kinect stehen (Abstand und Winkel). Die Erkennung ist optimal, wenn der Benutzer der Kinect zugewandt ist und die Arme nicht verdeckt sind. Schlechte Ergebnisse bekommt man, wenn man seitlich steht, die Arme verschränkt oder hinter dem Rücken sind. Problematisch ist auch, wenn ein Benutzer mit dem Rücken zur Kinect steht, selbst wenn die Arme gut sichtbar sind.
Gesichtserkennung
Die Kinect kann Gesichter von bis zu 6 Benutzerinnen erkennen. Man bekommt folgende Informationen über das jeweilige Gesicht:
- Region (Rechteck)
- 5 Schlüsselpunkte: Augen, Nase, Mundwinkel
- Zustand: Happy, Engaged, Left/Right eye closed, Looking away, Mouth moved, Mouth open, Wearing glasses
- Drahtgitter (Mesh / Vertex points)
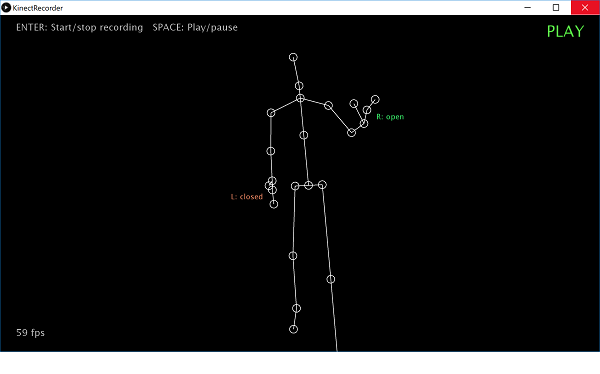
1.3.4 Skelett
Hier ein Beispiel für ein getracktes Skelett:
Erzeugt durch diesen Code:
import KinectPV2.KJoint;
import KinectPV2.*;

KinectPV2 kinect;

float zVal = 300;
float rotX = PI;
boolean showVideo = true;

void setup() {
  size(1024, 768, P3D);
  kinect = new KinectPV2(this);
  kinect.enableColorImg(true);
  kinect.enableSkeleton3DMap(true);
  kinect.init();
}

void draw() {
  background(255);
  if (showVideo) {
    image(kinect.getColorImage(), 0, 0, 320, 240);
  }

  //translate the scene to the center
  translate(width/2, height/2, 0);
  scale(zVal);
  rotateX(rotX);

  ArrayList skeletonArray =  kinect.getSkeleton3d();

  for (int i = 0; i < skeletonArray.size(); i++) {
    KSkeleton skeleton = (KSkeleton) skeletonArray.get(i);
    if (skeleton.isTracked()) {
      KJoint[] joints = skeleton.getJoints();
      stroke(skeleton.getIndexColor());
      drawSkeleton(joints);
    }
  }
}

void drawSkeleton(KJoint[] joints) {
  showJoint(joints[KinectPV2.JointType_Head]);
  showJoint(joints[KinectPV2.JointType_Neck]);
  showJoint(joints[KinectPV2.JointType_SpineShoulder]);
  showJoint(joints[KinectPV2.JointType_SpineMid]);
  showJoint(joints[KinectPV2.JointType_SpineShoulder]);
  showJoint(joints[KinectPV2.JointType_SpineBase]);

  // Right Arm
  showJoint(joints[KinectPV2.JointType_ShoulderRight]);
  showJoint(joints[KinectPV2.JointType_ElbowRight]);
  showJoint(joints[KinectPV2.JointType_WristRight]);
  showJoint(joints[KinectPV2.JointType_HandRight]);
  showJoint(joints[KinectPV2.JointType_HandTipRight]);
  showJoint(joints[KinectPV2.JointType_ThumbRight]);

  // Left Arm
  showJoint(joints[KinectPV2.JointType_ShoulderLeft]);
  showJoint(joints[KinectPV2.JointType_ElbowLeft]);
  showJoint(joints[KinectPV2.JointType_WristLeft]);
  showJoint(joints[KinectPV2.JointType_HandLeft]);
  showJoint(joints[KinectPV2.JointType_HandTipLeft]);
  showJoint(joints[KinectPV2.JointType_ThumbLeft]);

  // Right Leg
  showJoint(joints[KinectPV2.JointType_HipRight]);
  showJoint(joints[KinectPV2.JointType_KneeRight]);
  showJoint(joints[KinectPV2.JointType_AnkleRight]);
  showJoint(joints[KinectPV2.JointType_FootRight]);


  // Left Leg
  showJoint(joints[KinectPV2.JointType_HipLeft]);
  showJoint(joints[KinectPV2.JointType_KneeLeft]);
  showJoint(joints[KinectPV2.JointType_AnkleLeft]);
  showJoint(joints[KinectPV2.JointType_FootLeft]);
}

void showJoint(KJoint joint) {
  strokeWeight(10);
  point(joint.getX(), joint.getY(), joint.getZ());
}

void keyPressed() {
  if (key == ' ') {
    showVideo = !showVideo;
  }
}
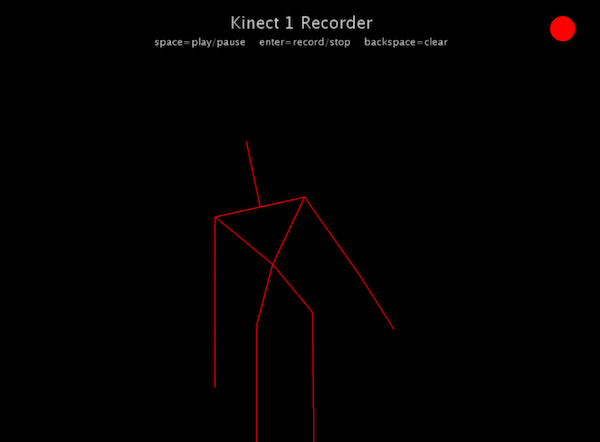
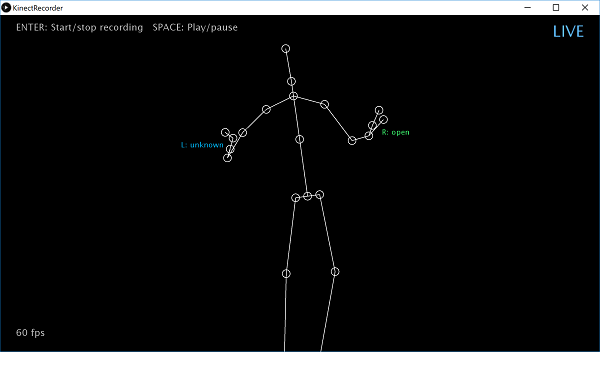
1.3.5 Bewegung aufzeichnen
Unter Kinect2Processing (GitHub) finden Sie den Sketch "KinectRecorder", mit dem Sie Bewegung aufzeichnen können.
Aufzeichnen bedeutet, dass in jedem "Frame" (i.d.R. 1/60-tel Sekunde) eine Skelettpose in einer Liste gespeichert wird. Eine Skelettpose besteht wiederum aus allen Positionen (3D-Punkte) der Gelenke (engl. joints).
1.4 Kinect 1
In diesem Abschnitt geht es um die Skeletterkennung bei der Kinect 1. Die verwendeten Techniken funktionieren auf einem Mac und unter Windows mit Processing in der alten Version 2 und der Library SimpleOpenNI.
Der Code zu diesem Abschnitt steht auch unter Kinect1Processing (GitHub).
Es gibt eine weitere Library namens Open Kinect for Processing von Daniel Shiffmann, die allerdings kein Skelett-Tracking erlaubt.
1.4.1 Einrichten von OpenNI
Wir verwenden hier das Paket OpenNI. In Processing gibt es die Library SimpleOpenNI.
Installation
Windows-User müssen die Software Kinect for Windows SDK v1.8 von Microsoft installieren (Downloadseite). Achten Sie darauf, dass Sie nicht die v2 laden.
Wir müssen das alte Processing 2 verwenden, damit wir die Library SimpleOpenNI nutzen können. Falls Sie mit Processing 3 arbeiten, installieren Sie zusätzlich Processing 2.1.1. Schauen Sie im Menü unter "Preferences" nach, wo sich das Sketchbook-Verzeichnis befindet (auf dem Mac unter Dokumente/Processing). Wenn Sie dieses Verzeichnis mit dem Explorer/Finder öffnen, sehen Sie das Unterverzeichnis libraries. Hier müssen wir unsere SimpleOpenNI-Library platzieren.
Laden Sie die Library als ZIP-Datei "SimpleOpenNI-1.96.zip" von der Downloadseite des Projekts runter. Entpacken Sie die Datei und verschieben Sie den Ordner "SimpleOpenNI" in den Ordner "libraries" im Sketchbook-Verzeichnis (s.o.).
Jetzt sind Sie bereit für den ersten Test.
Erster Test
Schließen Sie die Kinect an (Strom und USB an Rechner) und starten Sie Processing 2.
Laden Sie ein Beispielprogramm, indem Sie File > Examples... anwählen. Es öffnet sich ein Fenster mit Verzeichnissen. Gehen Sie in Contributed Libraries > SimpleOpenNI > OpenNI und öffnen Sie DepthImage (Doppelklick).
Dieses Programm zeigt Ihnen ein Tiefenbild als 3D-Szene.
Hier sehen wir einen Aussschnitt des Programms (von Max Rheiner):
import SimpleOpenNI.*;
SimpleOpenNI  context;

void setup()
{
  size(640*2, 480);
  context = new SimpleOpenNI(this);
  if (context.isInit() == false)
  {
    println("Can't init SimpleOpenNI");
    exit();
    return;
  }

  // mirror is by default enabled
  context.setMirror(true);

  // enable depthMap generation
  context.enableDepth();

  // enable ir generation
  context.enableRGB();
}

void draw()
{
  // update the cam
  context.update();

  background(200, 0, 0);

  // draw depthImageMap
  image(context.depthImage(), 0, 0);

  // draw irImageMap
  image(context.rgbImage(), context.depthWidth() + 10, 0);
}
Die hervorgehobenen Zeilen zeigen die minimalen Voraussetzungen für den Betrieb der Kinect an.
Nach dem Start sehen Sie das Tiefenbild als Monochromanzeige. Daneben sehen Sie auch das Webcambild (nicht im Screenshot).

Klasse SimpleOpenNI
Die Klasse SimpleOpenNI liefert die Grundfunktionalität, um die Kamera und Bildverarbeitung zu steuern. Die Kinect enthält zwei Kameras: eine Infrarot-Kamera (IR) und eine normale Webcam (RGB).
Wie Sie oben sehen, legen Sie ein SimpleOpenNI-Object als globale Variable an, instanziieren sie in setup() und rufen ihre update-Methode in draw() auf.
SimpleOpenNI sieht die Welt aus der Sicht der Kinect, d.h. für Sie ist das resultierende Bild spiegelverkehrt. Um dies zu drehen, verwenden Sie:
context.setMirror(true);
Webcam (RGB)
Wollen Sie das Webcam-Bild sehen, müssen Sie es einschalten:
context.enableRGB();
Sie können rgbHeight() und rgbWidth() verwenden, um die Bildschirmgröße genau auf die Größe der Webcam auszurichten.
Um das Kamerabild auszugeben, zeichnen Sie das aktuelle Bild einfach in draw() auf den Bildschirm:
image(context.rgbImage(), 0, 0);
Tiefenbild
Für das Tiefenbild gibt es analog:
context.enableDepth()
context.depthWidth()
context.depthHeight()
Zeichnen Sie das Bild in draw() mit:
image(context.depthImage(), 0, 0);
Will man das Tiefenbild in einer anderen Farbe haben, verwendet man:
context.setDepthImageColor(100, 150, 200); // Blauton...
Beispiel User3D
Um eine Kombination von verschiedenen Visualisierungen zu sehen, starten Sie User3D:
Sie sehen ein Tiefenbild, das Skelett und die Kinect als Quader. Die Kinect zeichnen Sie mit:
context.drawCamFrustum();
1.4.2 Skelett eines Benutzers erkennen und tracken
Zunächst müssen wir das Tracking in setup() einschalten:
context.enableUser();
Wir bereiten das Zeichnen des Skeletts vor und setzen die Größe des Fensters auf die Auflösung des Tiefenbildes:
void setup()
{
  // instantiate a new context
  context = new SimpleOpenNI(this);

  // enable depthMap generation
  context.enableDepth();

  // enable skeleton generation for all joints
  context.enableUser();

  background(200,0,0);
  stroke(0,0,255);
  strokeWeight(3);
  smooth();

  // create a window the size of the depth information
  size(context.depthWidth(), context.depthHeight());
}
Jede erkannte Person wird mit einem ID zwischen 1 und 10 versehen. Zu jedem Aufruf von draw() können wir feststellen, ob ein ID vergeben ist und also eine Person mit diesem ID getrackt gerade wird.
// for all users from 1 to 10
int i;
for (i=1; i<=10; i++)
{
  // check if the skeleton is being tracked
  if(context.isTrackingSkeleton(i))
  {
     drawSkeleton(i);
  }
}
Jetzt brauchen wir noch eine Funktion zum Zeichnen von Skelett mit ID i :
void drawSkeleton(int userId)
{

}
Skelett zeichnen
OpenNI erkennt 15 verschiedene Gelenke (joints). Jedes Gelenk hat einen ID, der in einer Konstanten gespeichert ist. Diese sind:
SimpleOpenNI.SKEL_HEAD
SimpleOpenNI.SKEL_NECK
SimpleOpenNI.SKEL_LEFT_SHOULDER
SimpleOpenNI.SKEL_LEFT_ELBOW
SimpleOpenNI.SKEL_LEFT_HAND
SimpleOpenNI.SKEL_RIGHT_SHOULDER
SimpleOpenNI.SKEL_RIGHT_ELBOW
SimpleOpenNI.SKEL_RIGHT_HAND
SimpleOpenNI.SKEL_TORSO
SimpleOpenNI.SKEL_LEFT_HIP
SimpleOpenNI.SKEL_LEFT_KNEE
SimpleOpenNI.SKEL_LEFT_FOOT
SimpleOpenNI.SKEL_RIGHT_HIP
SimpleOpenNI.SKEL_RIGHT_KNEE
SimpleOpenNI.SKEL_RIGHT_FOOT
Es wird sogar eine eigene Funktion zum Zeichnen eines "Knochens" (das ist die Linie zwischen zwei Gelenken) bereitgestellt, nämlich:
context.drawLimb(USER_ID, JOINT_1, JOINT_2);
Um das ganze Skelett zu zeichnen, schreiben wir:
void drawSkeleton(int userId)
{
  context.drawLimb(userId, SimpleOpenNI.SKEL_HEAD, SimpleOpenNI.SKEL_NECK);

  context.drawLimb(userId, SimpleOpenNI.SKEL_NECK, SimpleOpenNI.SKEL_LEFT_SHOULDER);
  context.drawLimb(userId, SimpleOpenNI.SKEL_LEFT_SHOULDER, SimpleOpenNI.SKEL_LEFT_ELBOW);
  context.drawLimb(userId, SimpleOpenNI.SKEL_LEFT_ELBOW, SimpleOpenNI.SKEL_LEFT_HAND);

  context.drawLimb(userId, SimpleOpenNI.SKEL_NECK, SimpleOpenNI.SKEL_RIGHT_SHOULDER);
  context.drawLimb(userId, SimpleOpenNI.SKEL_RIGHT_SHOULDER, SimpleOpenNI.SKEL_RIGHT_ELBOW);
  context.drawLimb(userId, SimpleOpenNI.SKEL_RIGHT_ELBOW, SimpleOpenNI.SKEL_RIGHT_HAND);

  context.drawLimb(userId, SimpleOpenNI.SKEL_LEFT_SHOULDER, SimpleOpenNI.SKEL_TORSO);
  context.drawLimb(userId, SimpleOpenNI.SKEL_RIGHT_SHOULDER, SimpleOpenNI.SKEL_TORSO);

  context.drawLimb(userId, SimpleOpenNI.SKEL_TORSO, SimpleOpenNI.SKEL_LEFT_HIP);
  context.drawLimb(userId, SimpleOpenNI.SKEL_LEFT_HIP, SimpleOpenNI.SKEL_LEFT_KNEE);
  context.drawLimb(userId, SimpleOpenNI.SKEL_LEFT_KNEE, SimpleOpenNI.SKEL_LEFT_FOOT);

  context.drawLimb(userId, SimpleOpenNI.SKEL_TORSO, SimpleOpenNI.SKEL_RIGHT_HIP);
  context.drawLimb(userId, SimpleOpenNI.SKEL_RIGHT_HIP, SimpleOpenNI.SKEL_RIGHT_KNEE);
  context.drawLimb(userId, SimpleOpenNI.SKEL_RIGHT_KNEE, SimpleOpenNI.SKEL_RIGHT_FOOT);
}
1.4.3 Events zum Tracking
Es werden Events ausgelöst, wenn eine Person den sichtbaren Bereich betritt oder verlässt.
void onNewUser(SimpleOpenNI curContext,int userId)
{
  println("New User Detected - userId: " + userId);

  context.startTrackingSkeleton(userId);
}

void onLostUser(int userId)
{
  println("User Lost - userId: " + userId);
}
1.4.4 Einzelne Gelenke in 3D
Im obigen haben wir die eingebaute Funktion drawLimb() verwendet, um das Skelett zu zeichnen. Wenn Sie Gesten erkennen wollen, müssen Sie in jedem Frame wissen, wo sich z.B. die linke Hand befindet. Die linke Hand ist im Skelett als Gelenk (joint) repräsentiert. Hier erfahren Sie, wie Sie die Position von Gelenken bekommen.
Gelenkposition
Die Position eines Gelenks bekommen Sie mit der Funktion getJointPositionSkeleton der Klasse Context. Dazu müssen Sie einen Vektor hineingeben, der dann mit der Position gefüllt wird:
context.getJointPositionSkeleton(USER_ID, JOINT_ID,
                                 VECTOR_FOR_POSITION);
Konkret kann das so aussehen:
PVector pos = new PVector(); // Vektor soll Position aufnehmen
context.getJointPositionSkeleton(userId,
                                 SimpleOpenNI.SKEL_HEAD, pos);
println(pos); // Position ausgeben
Projektion auf 2D-Bildschirm
Der Code steht auch unter Kinect1Processing (GitHub).
Wenn Sie mit dem Skelett 2D-Elemente kontrollieren wollen, die auf dem Bildschirm gezeichnet werden, oder wenn Sie z.B. Kopf oder Hände mit 2D-Elementen zeichnen wollen, benötigen Sie die projizierten 2D-Koordinaten eines Gelenks. Dies gibt Ihnen die Funktion
context.convertRealWorldToProjective(VECTOR_3D_POSITION,
                                     VECTOR_2D_PROJECTION);
Auch hier stellen Sie wieder einen Vektor zur Aufnahme des Zielwerts ein:
PVector projPos = new PVector();
context.convertRealWorldToProjective(pos, projPos);
Jetzt zeichnen wir einen Kreis an der Stelle des Kopfs mit Hilfe der 2D-Koordinaten in projPos.
float size = 100;
fill(255, 0, 0);
ellipse(projPos.x, projPos.y, size, size);
Der Kreis hat immer die gleiche Größe, auch wenn die Person näher kommt oder sich entfernt. Um die Größe ungefähr an die perspektivische Größe anzupassen, können wir die z-Komponente von projPos verwenden:
float distScale = 500 / projPos.z;
ellipse(projPos.x, projPos.y, distScale*size, distScale*size);
Hier ein komplettes Programm, mit dem Sie beliebige Gelenke einfärben können:

import SimpleOpenNI.*;

SimpleOpenNI  context;

void setup()
{
  context = new SimpleOpenNI(this);

  context.enableDepth(); // Tiefenbild ein
  context.enableUser(); // Skeletterkennung ein
  context.setMirror(true); // funktioniert derzeit nicht

  stroke(0);
  strokeWeight(2);

  size(context.depthWidth(), context.depthHeight());
}

void draw()
{
  background(200);

  context.update();

  for (int i=1; i<=10; i++)
  {
    if (context.isTrackingSkeleton(i))
    {
      drawSkeleton(i);
      highlightJoint(i, SimpleOpenNI.SKEL_HEAD, color(#FFBE43), 250);
      highlightJoint(i, SimpleOpenNI.SKEL_RIGHT_HAND, color(#3EFF45), 100);
      highlightJoint(i, SimpleOpenNI.SKEL_LEFT_HAND, color(#FF3C1A), 100);
    }
  }
}

void highlightJoint(int userId, int limbID, color col, float size)
{
  // get 3D position of a joint
  PVector jointPos = new PVector();
  context.getJointPositionSkeleton(userId, limbID, jointPos);

  // convert real world point to projective space
  PVector jointPos_Proj = new PVector();
  context.convertRealWorldToProjective(jointPos, jointPos_Proj);

  // create a distance scalar related to the depth (z dimension)
  float distanceScalar = (500 / jointPos_Proj.z);

  // set the fill colour to make the circle green
  fill(col);

  // draw the circle at the position of the head with the head size scaled by the distance scalar
  ellipse(jointPos_Proj.x, jointPos_Proj.y, distanceScalar*size, distanceScalar*size);
}

// draw the skeleton with the selected joints
void drawSkeleton(int userId)
{
  context.drawLimb(userId, SimpleOpenNI.SKEL_HEAD, SimpleOpenNI.SKEL_NECK);

  context.drawLimb(userId, SimpleOpenNI.SKEL_NECK, SimpleOpenNI.SKEL_LEFT_SHOULDER);
  context.drawLimb(userId, SimpleOpenNI.SKEL_LEFT_SHOULDER, SimpleOpenNI.SKEL_LEFT_ELBOW);
  context.drawLimb(userId, SimpleOpenNI.SKEL_LEFT_ELBOW, SimpleOpenNI.SKEL_LEFT_HAND);

  context.drawLimb(userId, SimpleOpenNI.SKEL_NECK, SimpleOpenNI.SKEL_RIGHT_SHOULDER);
  context.drawLimb(userId, SimpleOpenNI.SKEL_RIGHT_SHOULDER, SimpleOpenNI.SKEL_RIGHT_ELBOW);
  context.drawLimb(userId, SimpleOpenNI.SKEL_RIGHT_ELBOW, SimpleOpenNI.SKEL_RIGHT_HAND);

  context.drawLimb(userId, SimpleOpenNI.SKEL_LEFT_SHOULDER, SimpleOpenNI.SKEL_TORSO);
  context.drawLimb(userId, SimpleOpenNI.SKEL_RIGHT_SHOULDER, SimpleOpenNI.SKEL_TORSO);

  context.drawLimb(userId, SimpleOpenNI.SKEL_TORSO, SimpleOpenNI.SKEL_LEFT_HIP);
  context.drawLimb(userId, SimpleOpenNI.SKEL_LEFT_HIP, SimpleOpenNI.SKEL_LEFT_KNEE);
  context.drawLimb(userId, SimpleOpenNI.SKEL_LEFT_KNEE, SimpleOpenNI.SKEL_LEFT_FOOT);

  context.drawLimb(userId, SimpleOpenNI.SKEL_TORSO, SimpleOpenNI.SKEL_RIGHT_HIP);
  context.drawLimb(userId, SimpleOpenNI.SKEL_RIGHT_HIP, SimpleOpenNI.SKEL_RIGHT_KNEE);
  context.drawLimb(userId, SimpleOpenNI.SKEL_RIGHT_KNEE, SimpleOpenNI.SKEL_RIGHT_FOOT);
}

// Event-based Methods

// when a person ('user') enters the field of view
void onNewUser(SimpleOpenNI curContext, int userId)
{
  println("New User Detected - userId: " + userId);

  context.startTrackingSkeleton(userId);
}

// when a person ('user') leaves the field of view
void onLostUser(int userId)
{
  println("User Lost - userId: " + userId);
}
1.4.5 Interaktion
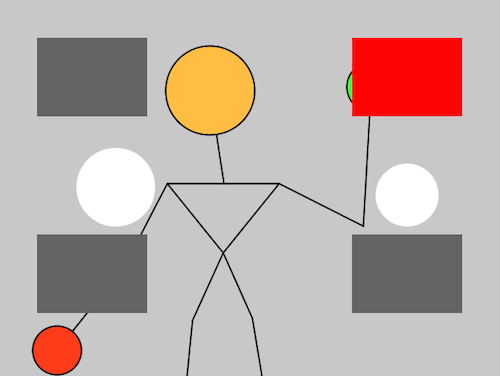
Wir verwenden das Programm von oben, um mit unseren interaktiven 2D-Elementen zu interagieren: Wenn eine Hand ein 2D-Objekt auf dem Bildschirm berührt, wird das Element selektiert.
Der Code steht auch unter Kinect1Processing (GitHub).
Das Hauptprogramm:
import SimpleOpenNI.*; import java.util.*; Listthings = new ArrayList (); List points = new ArrayList (); SimpleOpenNI context; void setup() { context = new SimpleOpenNI(this); context.enableDepth(); // Tiefenbild ein context.enableUser(); // Skeletterkennung ein context.setMirror(true); // funktioniert derzeit nicht size(context.depthWidth(), context.depthHeight()); things.add(new InteractiveRect(50, 50, 140, 100)); things.add(new InteractiveRect(50, 300, 140, 100)); things.add(new InteractiveRect(450, 50, 140, 100)); things.add(new InteractiveRect(450, 300, 140, 100)); things.add(new InteractiveCircle(150, 240, 100)); things.add(new InteractiveCircle(520, 250, 80)); } void draw() { background(200); context.update(); for (int i=1; i<=10; i++) { if (context.isTrackingSkeleton(i)) { points.clear(); drawSkeleton(i); highlightJoint(i, SimpleOpenNI.SKEL_HEAD, color(#FFBE43), 250); points.add(highlightJoint(i, SimpleOpenNI.SKEL_LEFT_HAND, color(#FF3C1A), 100)); points.add(highlightJoint(i, SimpleOpenNI.SKEL_RIGHT_HAND, color(#3EFF45), 100)); for (InteractiveThing thing: things) { thing.update(points); } } } // Alle objekte zeichnen for (InteractiveThing thing: things) { thing.draw(); } } PVector highlightJoint(int userId, int limbID, color col, float size) { stroke(0); strokeWeight(2); // get 3D position of a joint PVector jointPos = new PVector(); context.getJointPositionSkeleton(userId, limbID, jointPos); // convert real world point to projective space PVector jointPos_Proj = new PVector(); context.convertRealWorldToProjective(jointPos, jointPos_Proj); // create a distance scalar related to the depth (z dimension) float distanceScalar = (500 / jointPos_Proj.z); // set the fill colour to make the circle green fill(col); println("ellipse: " + jointPos_Proj.x + " " + jointPos_Proj.y); // draw the circle at the position of the head with the head size scaled by the distance scalar ellipse(jointPos_Proj.x, jointPos_Proj.y, distanceScalar*size, distanceScalar*size); return jointPos_Proj; } // draw the skeleton with the selected joints void drawSkeleton(int userId) { stroke(0); strokeWeight(2); context.drawLimb(userId, SimpleOpenNI.SKEL_HEAD, SimpleOpenNI.SKEL_NECK); context.drawLimb(userId, SimpleOpenNI.SKEL_NECK, SimpleOpenNI.SKEL_LEFT_SHOULDER); context.drawLimb(userId, SimpleOpenNI.SKEL_LEFT_SHOULDER, SimpleOpenNI.SKEL_LEFT_ELBOW); context.drawLimb(userId, SimpleOpenNI.SKEL_LEFT_ELBOW, SimpleOpenNI.SKEL_LEFT_HAND); context.drawLimb(userId, SimpleOpenNI.SKEL_NECK, SimpleOpenNI.SKEL_RIGHT_SHOULDER); context.drawLimb(userId, SimpleOpenNI.SKEL_RIGHT_SHOULDER, SimpleOpenNI.SKEL_RIGHT_ELBOW); context.drawLimb(userId, SimpleOpenNI.SKEL_RIGHT_ELBOW, SimpleOpenNI.SKEL_RIGHT_HAND); context.drawLimb(userId, SimpleOpenNI.SKEL_LEFT_SHOULDER, SimpleOpenNI.SKEL_TORSO); context.drawLimb(userId, SimpleOpenNI.SKEL_RIGHT_SHOULDER, SimpleOpenNI.SKEL_TORSO); context.drawLimb(userId, SimpleOpenNI.SKEL_TORSO, SimpleOpenNI.SKEL_LEFT_HIP); context.drawLimb(userId, SimpleOpenNI.SKEL_LEFT_HIP, SimpleOpenNI.SKEL_LEFT_KNEE); context.drawLimb(userId, SimpleOpenNI.SKEL_LEFT_KNEE, SimpleOpenNI.SKEL_LEFT_FOOT); context.drawLimb(userId, SimpleOpenNI.SKEL_TORSO, SimpleOpenNI.SKEL_RIGHT_HIP); context.drawLimb(userId, SimpleOpenNI.SKEL_RIGHT_HIP, SimpleOpenNI.SKEL_RIGHT_KNEE); context.drawLimb(userId, SimpleOpenNI.SKEL_RIGHT_KNEE, SimpleOpenNI.SKEL_RIGHT_FOOT); } // Event-based Methods // when a person ('user') enters the field of view void onNewUser(SimpleOpenNI curContext, int userId) { println("New User Detected - userId: " + userId); context.startTrackingSkeleton(userId); } // when a person ('user') leaves the field of view void onLostUser(int userId) { println("User Lost - userId: " + userId); }
Unsere InteractiveThing Datei ist leicht angepasst: Die Objekte reagieren jetzt auf eine Liste von Punkten, da ein Objekte sowohl mit der rechten als auch mit der linken Hand berührbar sein soll.
interface InteractiveThing {
void draw();
void update(List points);
}
class InteractiveRect implements InteractiveThing {
int rx = 0;
int ry = 0;
int rwidth;
int rheight;
boolean selected = false;
InteractiveRect(int x, int y, int w, int h) {
rx = x;
ry = y;
rwidth = w;
rheight = h;
}
void draw() {
noStroke();
if (selected)
fill(255, 0, 0);
else
fill(100);
rect(rx, ry, rwidth, rheight);
}
void update(List points ) {
selected = false;
for (PVector v: points) {
if ((rx <= v.x && v.x <= rx + rwidth &&
ry <= v.y && v.y <= ry + rheight))
selected = true;
}
}
}
class InteractiveCircle implements InteractiveThing {
int cx = 0;
int cy = 0;
int diameter;
boolean selected = false;
InteractiveCircle(int x, int y, int d) {
cx = x;
cy = y;
diameter = d;
}
void draw() {
noStroke();
if (selected)
fill(255, 0, 0);
else
fill(255);
ellipse(cx, cy, diameter, diameter);
}
void update(List points ) {
selected = false;
for (PVector v: points) {
if (dist(v.x, v.y, cx, cy) < diameter/2)
selected = true;
}
}
}
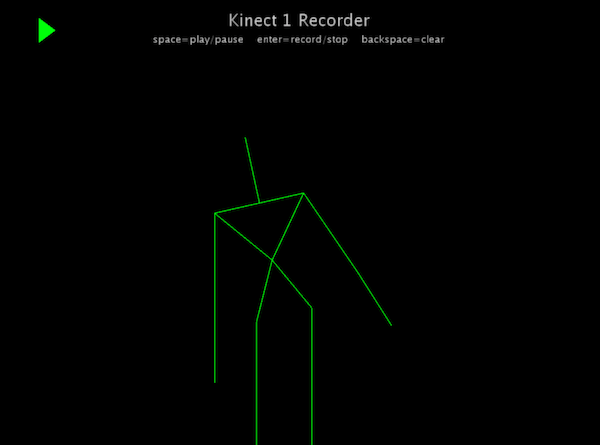
1.4.6 Bewegung aufzeichnen
Unter Kinect1Processing (GitHub) finden Sie Code, um Bewegung aufzuzeichnen.
Aufzeichnen bedeutet, dass in jedem "Frame" (i.d.R. 1/60-tel Sekunde) eine Skelettpose in einer Liste gespeichert wird. Eine Skelettpose besteht wiederum aus allen Positionen (3D-Punkte) der Gelenke (engl. joints).