4.1 Eye Tracking
Eye tracking allows you to obtain the screen coordinates of where the user is looking at on the screen.

4.1.1 Scenarios
Typical usage scenarios are:
- Aiming and steering: Gaze can be used to position an aimaing device (crosshairs) while an action (selection, shooting, deleting ...) is performed with a second technique/device (button, gesture, speech). Gaze can also be used for steering; one needs a clutch to enable/disalbe steering when the need to look around arises.
- Assistance for people with disabilities: An eye tracker allows a person to control a mouse-like interface without having to move his/her hands.
- User studies: Analyzing where a user looks, for how long and in which order is one tool for evaluating web pages in terms of usability and user experience. One usually looks at dwell times (often accumulated as heat maps), identifies regions of interest (ROI) or tries to trace out gaze paths (temporal order of ROI traversal).
4.1.2 Student Projects
Check out the following student projects that used an eye tracker:
- Fast Reader: Optimized fast reading using gaze
- eyeSelect: Studying the impact of dwell-time
- Talky: Gaze-based selection of discrete targets like hyperlinks
4.2 Gaze-based Interaction
In our course an eye tracker is interesting as an interface device, especially in conjunction with other input modalities (keyboard, touch, proximity, voice etc.). The challenge of using an gaze for interaction is, of course, that you use your eyes all the time and sometimes quite arbitrarily for looking at things in your surroundings. If you want to use your gaze as a functional input for an interface you have to either force the user to use gaze in a very disciplined manner or you have to intelligently decide when gaze is intended as an input and when not.
If sensitive areas - something like buttons - are triggered unintentionally we speak of yet another example of the Midas Touch problem.
4.3 Tobii Eye Tracker 4C
Technically an eye tracker consists of a camera that recognizes the pupil of the eye. The camera's location can be fixed, usually underneath or on top of the screen, or the camera can be wearable, i.e. attached to the user, near his/her eye, e.g. on the frame of some glasses or goggles.
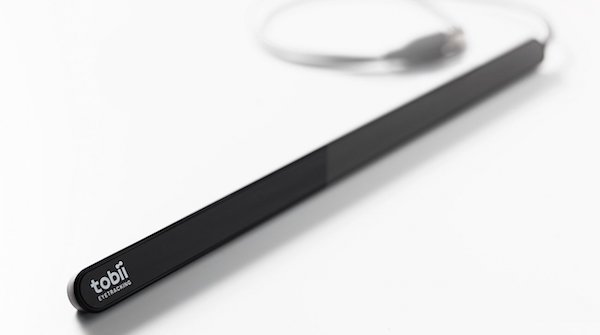
In this chapter we discuss the consumer-level Tobii Eye Tracker 4C which was developed for gaming purposes. This model is the successor to the model EyeX. It is a small bar that you put underneath your monitor and that tracks your eyes and head. In 09/2017 the price is around 160 Euros.
For coding in C++ under Windows, you can have a look at the Tobii EyeX SDK.
In the following we show how to use Processing with the eye tracker. This works with Processing and has been tested under Windows 10 (it looks like there is no solution for the Mac).
4.3.1 Setting up the Tracker
Install the eye tracker software (Tobii Eye Tracking Core Software) on Windows:
https://tobiigaming.com/getstarted
The package contains the driver and software for calibration of the tracker (you have to look at various points on the screen for a certain amount of time). It also features a little game for demonstration.
4.3.2 Connecting to Tracker
For you own development you would like to have the coordinates where the user is looking at on the screen over time, i.e. a stream of coordinates.
Augusto Est provides a Windows program to post the eye tracker's data on a network port. Download the whole package from
https://github.com/AugustoEst/gazetrack
For our purposes you only need to start the following executable from the "GazeTrackEyeXGazeStream" folder:
GazeTrackEyeXGazeStream.exeIf you start it and your Tobii tracker is connected you should see a console with data rolling down.
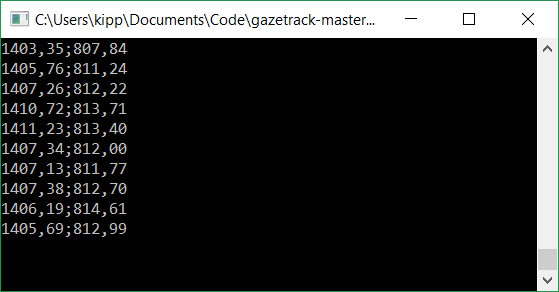
This data is also transmitted by UDP on port 11000 in the format
111.123;211.555Those are the x/y coordinates of the current eye gaze position on the screen. In some countries (like Germany) you have the problem that there is a comma instead of a period which makes Augusto Est's Processing program fail in those countries (just use my code below).
Apart from coordinates the following two token are sent depending on whether a user is detected or not:
NotPresent
Present
From my personal experience this does not work very reliably.
4.3.3 Connecting with Processing
Start Processing 3 and import the library called UDP (in the menu Sketch > import library > add library..). This library allows to listen for UDP network messages on a particular port on your computer.
Make sure your Tobii tracker is connected (USB) and you have started GazeTrackEyeXGazeStream.exe and see the coordinates rolling down in a console.
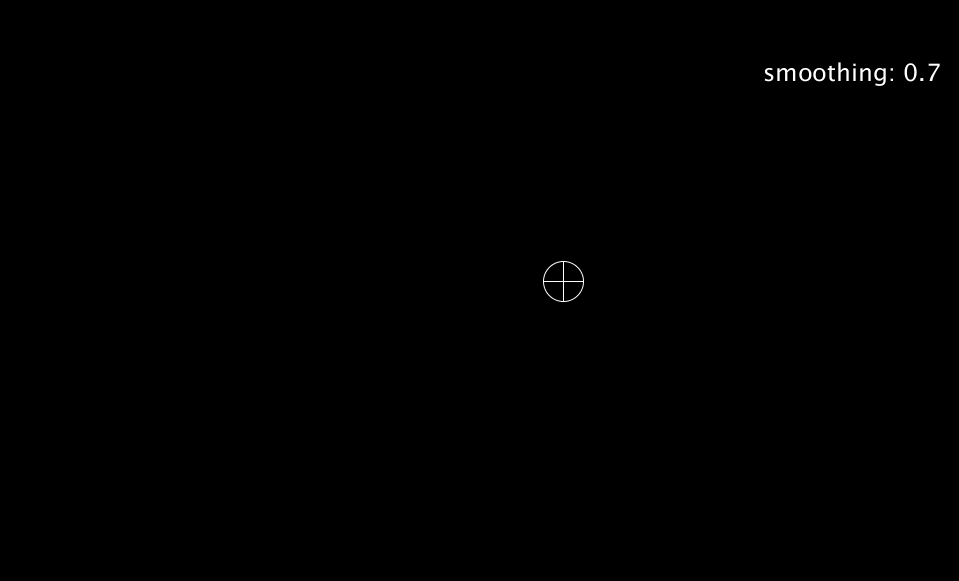
Now you can use the following code to catch the gaze data and display e.g. a gaze cursor. Note that the following uses smoothing to make the signal more stable. You can adjust the smoothing variable where 0 is no smoothing and values close to 1 are extreme smoothing. The higher the smoothing (close to 1), the higher the time lag, i.e. the cursor trails behind your gaze.
import hypermedia.net.*;

UDP udp;
float x = 0;
float y = 0;
float smoothing = 0.7;
boolean isPresent = false;

void setup() {
  udp = new UDP(this, 11000); // connection on port 11000
  udp.listen(true);
  fullScreen();
  textSize(24);
}

void draw() {
  background(0);
  stroke(255);
  noFill();
  ellipse(x, y, 40, 40);
  line(x-20, y, x+20, y);
  line(x, y-20, x, y+20);

  // show info
  fill(255);
  text("smoothing: " + smoothing, width - 200, 100);
}

// This is called by the UDP connection each time
// a message is received

void receive( byte[] data, String ip, int port ) {
  data = subset(data, 0, data.length-2);
  String message = new String(data);

  // Parse gaze coordinates
  int pos = message.indexOf(";");
  if (pos > -1) {
    String[] xs = message.substring(0, pos).split("[,.]");
    String[] ys = message.substring(pos+1).split("[,.]");
    float x1 = Float.parseFloat(xs[0]);
    float y1 = Float.parseFloat(ys[0]);
    x = smoothing * x + (1 - smoothing) * x1;
    y = smoothing * y + (1 - smoothing) * y1;
  }
  if (message.startsWith("Pres")) {
    isPresent = true;
  }
  if (message.startsWith("NotPres")) {
    isPresent = false;
  }
}
You should see something like this:
4.4 Gaze Buttons
Conventional buttons work in two steps:
- User positions cursor above a button
- User clicks with a mouse button
With gaze (as with gesture) the second step needs to be replaced. One technique is to use a timeout (also called dwell time), i.e. if the position of the gaze remains on top of the button for a certain amount of time (the timeout) the button is triggered.
In Processing we write a class TimeoutButton like this:
class TimeoutButton {
  int x;
  int y;
  int w;
  int h;
  float timeout;

  boolean inside;
  int startFrame;
  int showPress = 0;
  float secInside = -1;

  TimeoutButton(int x, int y, int w, int h, float timeout) {
    this.x = x;
    this.y = y;
    this.w = w;
    this.h = h;
    this.timeout = timeout;
  }

  void render() {

    // white after pressed
    if (showPress > 0) {
      fill(255);
      showPress--;
    } else {
      fill(100);
    }
    noStroke();
    rect(x, y, w, h);

    // show progress in red
    if (secInside > 0 && showPress <= 0) {
      fill(255,0,0);
      rect(x, y, secInside/timeout * w, h);
    }
  }

  void update(float xp, float yp) {
    if (xp >= x && xp <= x + w && yp >= y && yp <= y + h) {
      if (inside) {
        secInside = (float(frameCount - startFrame)) / frameRate;
        if (secInside > timeout) {
          startFrame = frameCount;
          pressed();
        }
      } else {
        inside = true;
        startFrame = frameCount;
      }
    } else {
      inside = false;
      secInside = -1;
    }
  }

  void pressed() {
    showPress = 10;
    secInside = -1;
  }
}
Now we can create buttons and update them in draw():
UDP udp;
float x = 0;
float y = 0;
float smoothing = 0.7;
boolean isPresent = false;
ArrayList<TimeoutButton> buttons = new ArrayList<TimeoutButton>();
void setup() {
udp = new UDP(this, 11000); // connection on port 11000
udp.listen(true);
fullScreen();
textSize(24);
buttons.add(new TimeoutButton(300,300,300,200,1));
buttons.add(new TimeoutButton(800,500,200,200,2));
buttons.add(new TimeoutButton(1000,200,100,100,.5));
}
void draw() {
background(0);
// handle buttons
for (TimeoutButton b: buttons){
b.render();
b.update(x, y);
}
// draw cursor
stroke(255);
noFill();
ellipse(x, y, 40, 40);
line(x-20, y, x+20, y);
line(x, y-20, x, y+20);
// show info
fill(255);
text("smoothing: " + smoothing, width - 200, 100);
}
void receive( byte[] data, String ip, int port ) {
data = subset(data, 0, data.length-2);
String message = new String(data);
// Parse gaze coordinates
int pos = message.indexOf(";");
if (pos > -1) {
String[] xs = message.substring(0, pos).split("[,.]");
String[] ys = message.substring(pos+1).split("[,.]");
float x1 = Float.parseFloat(xs[0]);
float y1 = Float.parseFloat(ys[0]);
x = smoothing * x + (1 - smoothing) * x1;
y = smoothing * y + (1 - smoothing) * y1;
}
if (message.startsWith("Pres")) {
isPresent = true;
}
if (message.startsWith("NotPres")) {
isPresent = false;
}
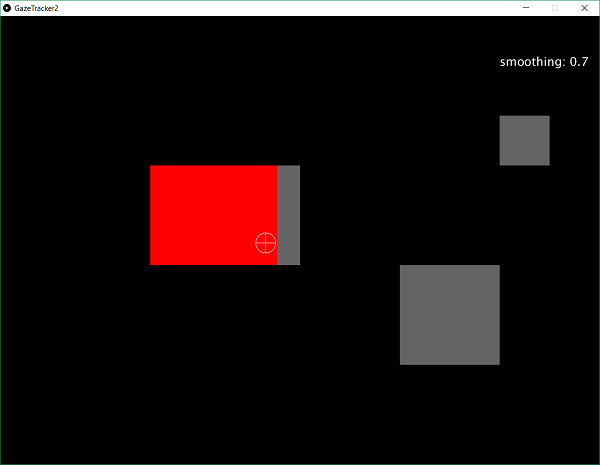
}You should see three buttons with a different timeout each. The dwell time of each button is visualized in red.