In diesem Kapitel überlegen wir uns, wie einfach interaktive Elemente funktionieren. Wir verwenden absichtlich keine vorhandenen Libraries und Pakete, die Ihnen Schaltflächen und Controller "schenken", sondern bauen alles in liebevoller Handarbeit selbst, damit wir später, wenn wir Multitouch hinzunehmen, die volle Kontrolle haben.
In diesem Kapitel beschäftigen wir uns auch mit der Frage, wie Sie einen Touchpoint, den Sie im world space auffangen, in einen transformierten Raum bringen, um dort Kollisionserkennung durchzuführen.
1.1 Rollover / Kollisionserkennung
Das einfachste interaktive Element ist eine Form, die "aktiv" wird, sobald der Mauszeiger auf ihr liegt, und "inaktiv", sobald der Mauszeiger wieder fort ist.
Dazu müssen wir zunächst wissen, wie wir feststellen, dass "der Mauszeiger auf einem Objekt liegt". Das nennt man auch Kollisionerkennung und ist in Spielen von hoher Bedeutung.
1.1.1 Rechteck
Kollisionserkennung zwischen einem Punkt (Mauszeiger) und eine Rechteck, das parallel zu den Achsen des Koordinatensystems liegt, ist sehr einfach. Wenn der Punkt (x, y) ist und das rechteck über rx, ry, rwidth, rheight definiert ist, dann liegt eine Kollision vor, wenn die folgenden zwei Bedingungen gelten
rx <= x <= rx + rwidth
ry <= y <= ry + rheight
Im Code sieht das so aus (statt x, y finden Sie mouseX, mouseY):
// interface_1
// Kollision mit Rechteck (Selektion per Rollover)

int rx = 50;
int ry = 50;
int rwidth = 150; // Breite
int rheight = 200; // Höhe

void setup() {
  size(300, 300);
  noStroke();
}

void draw() {

  // setze Füllfarbe ...
  if (rx <= mouseX && mouseX <= rx + rwidth &&
    ry <= mouseY && mouseY <= ry + rheight) {
    // ... wenn Mauszeiger im Rechteck => rot
    fill(255, 0, 0);
  }
  else {
    // ... sonst: weiß
    fill(255);
  }
  rect(rx, ry, rwidth, rheight);
}
Interaktives Feld: (gehen Sie mit der Maus über das Rechteck!)
1.1.2 Kreis
Kollisionserkennung zwischen einem Punkt und einem Kreis ist sogar noch einfacher. Dazu vergleicht man die Distanz des Punkts (x, y) mit dem Mittelpunkt (cx, cy) des Kreises. Ist die Distanz geringer als der Radius, so ist der Punkt im Kreis:
dist(x, y, cx, cy) < radius
Die Funktion dist() berechnet den Abstand zweier Punkte. Im folgenden Code nehmen wieder mouseX, mouseY den Platz von x, y ein und der Radius errechnet sich aus diameter/2.
// interface_2
// Kollision mit Kreis (Selektion per Rollover)

int cx = 170;
int cy = 160;
int diameter = 180; // Durchmesser

void setup() {
  size(300, 300);
  noStroke();
}

void draw() {
  // setze Füllfarbe ...
  if (dist(mouseX, mouseY, cx, cy) < diameter/2) {
    // ... wenn Mauszeiger im Rechteck => rot
    fill(255, 0, 0);
  }
  else {
    // ... sonst: weiß
    fill(255);
  }
  ellipse(cx, cy, diameter, diameter);
}
Interaktives Feld: (gehen Sie mit der Maus über den Kreis!)
1.2 Interaktive Objekte
Jetzt möchten wir die interaktiven Formen als Klassen definieren, damit wir mehrere Formen erzeugen und nutzen können. Eine solche Form könnte so aussehen:
class InteractiveRect implements InteractiveThing {

  int rx = 0;
  int ry = 0;
  int rwidth;
  int rheight;
  boolean selected = false;

  InteractiveRect(int x, int y, int w, int h) {
    rx = x;
    ry = y;
    rwidth = w;
    rheight = h;
  }

  void draw() {
    if (selected)
      fill(255, 0, 0);
    else
      fill(255);
    rect(rx, ry, rwidth, rheight);
  }

  void update(int inputX, int inputY) {
    selected = (rx <= inputX && inputX <= rx + rwidth &&
      ry <= inputY && inputY <= ry + height);
  }
}
Der Code hat zwei Methoden. Eine zum Zeichnen (draw) und eine zum Prüfen, ob die Form vom Mauszeiger getroffen wurde. Dann wird der Zustand der Variable selected geändert, die wiederum die Färbung bestimmt.
Ferner gehorcht die Klasse dem Interface InteractiveThing , damit wir später auch Kreise hinzunehmen können.
interface InteractiveThing {
  void draw();
  void update(int ix, int iy);
}
Für Kreise können wir dann definieren:
class InteractiveCircle implements InteractiveThing {

  int cx = 0;
  int cy = 0;
  int diameter;
  boolean selected = false;

  InteractiveCircle(int x, int y, int d) {
    cx = x;
    cy = y;
    diameter = d;
  }

  void draw() {
    if (selected)
      fill(255, 0, 0);
    else
      fill(255);
    ellipse(cx, cy, diameter, diameter);
  }

  void update(int inputX, int inputY) {
    selected = dist(inputX, inputY, cx, cy) < diameter/2;
  }
}
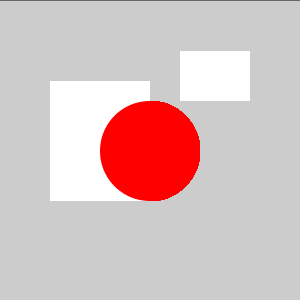
Jetzt können wir eine Liste von interaktiven Objekten anlegen. Dazu müssen wir die Klasse ArrayList und das Interface List aus der Java-Standardbibliothek (Paket java.util) importieren.
import java.util.*; Listthings = new ArrayList (); void setup() { size(300, 300); noStroke(); things.add(new InteractiveRect(50, 80, 100, 120)); things.add(new InteractiveRect(180, 50, 70, 50)); things.add(new InteractiveCircle(150, 150, 100)); } void draw() { // Alle Objekte zeichnen und mit Inputpunkten updaten for (InteractiveThing thing: things) { thing.update(mouseX, mouseY); thing.draw(); } }
1.2.1 Selektion
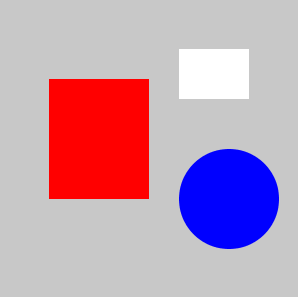
Jetzt möchten wir Schalten, d.h. wir merken uns, ob eine Form angeklickt wurde und setzen den Zustand auf "selektiert" (beim nächsten Mal dann auf "deselektiert" etc.).
Bei den Formen ändern wir das Verhalten von update(). Hier wird der Schalter selected , sofern die Maus auf dem Objekt ist, umgedreht (durch Negation). Hier bei InteractiveRect :
void update(int inputX, int inputY) {
    // Umschalten, falls auf Objekt
    if (rx <= inputX && inputX <= rx + rwidth &&
      ry <= inputY && inputY <= ry + height)
      selected = !selected;
}
Hier bei InteractiveCircle:
void update(int inputX, int inputY) {

    // Umschalten, falls auf Objekt
    if (dist(inputX, inputY, cx, cy) < diameter/2)
      selected = !selected;
}
Im Hauptprogramm rufen wir update() nur dann auf, wenn der Mausknopf gedrückt wurde.
void draw() {
  background(200);

  // Alle objekte zeichnen
  for (InteractiveThing thing: things) {
    thing.draw();
  }
}

void mousePressed() {
  // Erst updaten, wenn Mausknopf gedrückt
  for (InteractiveThing thing: things) {
    thing.update(mouseX, mouseY);
  }
}
Interessant ist dies, wenn wir z.B. alle selektierten Formen gleichzeitig bewegen wollen. Im Hauptprogramm würde man das so machen:
void keyPressed() {
  for (InteractiveThing thing: things) {
    if (thing.isSelected()) {
      if (keyCode == LEFT) {
        thing.move(-2, 0);
      }
      else if (keyCode == RIGHT) {
        thing.move(2, 0);
      }
      else if (keyCode == UP) {
        thing.move(0, -2);
      }
      else if (keyCode == DOWN) {
        thing.move(0, 2);
      }
    }
  }
}
Jetzt fehlt noch Code bei den interaktiven Klassen. Zunächst fehlen die Methoden isSelected() und move(). Die müssen ins Interface:
interface InteractiveThing {
  void draw();
  void update(int ix, int iy);
  boolean isSelected();
  void move(int dx, int dy);
}
Bei beiden Klassen sehen die entsprechenden Methoden so aus:
boolean isSelected() {
   return selected;
}

void move(int dx, int dy) {
   rx += dx;
   ry += dy;
}
1.3 Verschieben
Die nächste Herausforderung ist es, ein Objekt zu verschieben, also zu "draggen". Dazu können Sie die bisherigen Klassen nutzen sowie die Systemvariablen, die die Mausposition im vorigen Frame enthalten: pmouseX und pmouseY . Versuchen Sie, dies selbst zu implementieren.
1.4 Verschieben mit translate
Das "draggen" eines Objekts führen wir jetzt mit der geometrischen Transformation translate() durch. Lesen Sie im Processing-Skript nach, wie translate() funktioniert.
Hauptprogramm:
// interface_6 // Objekte verschieben mit Drag // jetzt mit translate() import java.util.*; Listthings = new ArrayList (); void setup() { size(300, 300); noStroke(); things.add(new InteractiveRect(50, 80, 100, 120)); things.add(new InteractiveRect(180, 50, 70, 50)); } void draw() { background(200); // Alle objekte zeichnen for (InteractiveThing thing: things) { thing.draw(); } } void mouseDragged() { // Erst updaten, wenn Maus gedragt for (InteractiveThing thing: things) { thing.update(pmouseX, pmouseY, mouseX, mouseY); } }
Unsere Klasse erledigt das Zeichnen in ihrer draw() Methode. Das Rechteck wird in seinem object space bei (0, 0) gezeichnet und erst dann mit translate() an den entsprechenden Ort geschoben.
Beachten Sie, dass Sie pushMatrix/popMatrix verwenden müssen, damit Objekte, die später gezeichnet werden, nicht von den Transformationen der früher gezeichneten Objekte beeinflusst werden.
interface InteractiveThing {
  void draw();
  void update(int pix, int piy, int ix, int iy);
}

class InteractiveRect implements InteractiveThing {

  int rx = 50;
  int ry = 50;
  int rwidth = 150; // Breite
  int rheight = 200; // Höhe
  boolean selected = false;

  InteractiveRect(int x, int y, int w, int h) {
    rx = x;
    ry = y;
    rwidth = w;
    rheight = h;
  }

  void draw() {
    pushMatrix();
    if (selected)
      fill(255, 0, 0);
    else
      fill(255);

    translate(rx, ry);

    rect(0, 0, rwidth, rheight);
    popMatrix();
  }

  void update(int pinputX, int pinputY,
              int inputX, int inputY) {
    // Umschalten, falls auf Objekt
    if (rx <= inputX && inputX <= rx + rwidth &&
      ry <= inputY && inputY <= ry + rheight) {
      rx += inputX - pinputX;
      ry += inputY - pinputY;
    }
  }
}
1.4.1 Exkurs: Umrechnen zwischen world space und object space
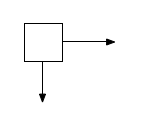
Nehmen wir an, wir wollen ein Quadrat im Objektraum um den Nullpunkt herum zeichnen:
Der world space ist unser Processing-Grafikfenster:
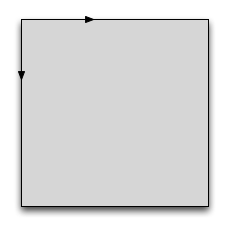
Wenn wir das Quadrat z.B. mit translate() bewegen, sieht das so aus:
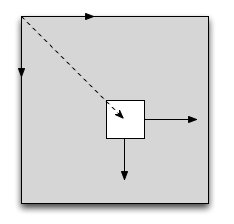
Wie berechnet Processing dies? Ganz einfach: es verwendet die Transformationsmatrix, die sich nach dem translate() ergibt, um für jeden Punkt im Objektraum (Quadrat) den entsprechenden Punkt in der Welt (Processing-Fenster) zu errechnen.
Anders gesagt: die aktuelle Matrix M berechnet, wie ich einen Punkt im object space (xobj) umrechne in den _world space, wo der Punkt x_w dann ja gezeichnet wird:
[1] M x_obj = x_w
Jetzt nehmen wir an, wir bekommen einen Touchpunkt xt. Die Koordinaten liegen i.d.R. im _world space:
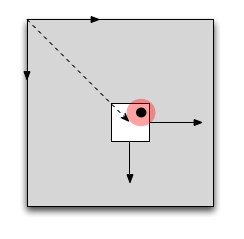
Um eine Kollisionsberechnung mit einem Objekt anzustellen, wäre es aber viel komfortabler, wir würden die Position im object space kennen, insbesondere weil ja auch Rotationen und Skalierungen vorkommen könnten! Diese bekommen wir aber durch obige Gleichung, multipliziert mit der Inversen von M:
[2] x_obj = M_inv x_w
Konkret heißt das: jedes Objekt sollte die Matrix seines lokalen Koordinatensystems speichern und invertieren. Am besten sollte die inverse Matrix immer nur dann aktualisiert werden, wenn sich die Matrix ändern, da Matrizeninversion nicht performant ist.
Bei einem Touchevent, verwendet man obige Gleichung 2 und setzt dort in x_w die Koordinaten des Touches ein. Das Ergebnis ist die Position des Touches im Objektraum.
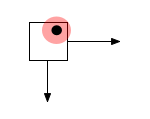
Eine Kollisionserkennung ist dann meist trivial.
1.5 Translation (Drag) und Rotation (Taste)
Wenn wir zu dem Code von 1.5 Rotation hinzufügen, haben wir ein Problem: Die Kollisionserkennung (ist der Mauszeiger auf dem Objekt?) ist nicht mehr so einfach. Wir sehen uns zunächst den "falschen" Code an.
Wieder zuerst das Hauptprogramm:
// interface_7 // Objekte verschieben mit Drag // jetzt mit translate() und rotate() // PROBLEM: Kollisionsberechung stimmt nicht mehr! import java.util.*; Listthings = new ArrayList (); void setup() { size(300, 300); noStroke(); things.add(new InteractiveRect(50, 80, 100, 120)); things.add(new InteractiveRect(180, 50, 70, 50)); } void draw() { background(200); // Alle objekte zeichnen for (InteractiveThing thing: things) { thing.draw(); } } void mousePressed() { for (InteractiveThing thing: things) { thing.clicked(mouseX, mouseY); } } void mouseDragged() { // Erst updaten, wenn Maus gedragt for (InteractiveThing thing: things) { thing.update(pmouseX, pmouseY, mouseX, mouseY); } } void keyPressed() { for (InteractiveThing thing: things) { if (thing.isSelected()) { if (keyCode == LEFT) { thing.incRotation(-.1); } else if (keyCode == RIGHT) { thing.incRotation(.1); } } } }
Hier das Interface und die Klasse. Wir brauchen ein paar Methoden mehr, um die Rotation zu steuern. Beachten Sie, dass in update() und clicked() die Kollisionsberechnung ganz normal im world space arbeitet und davon ausgeht, dass das Rechteck gar nicht gedreht ist!
interface InteractiveThing {
  void draw();
  void update(int pix, int piy, int ix, int iy);
  void clicked(int x, int y);
  void incRotation(float angle);
  boolean isSelected();
}

class InteractiveRect implements InteractiveThing {

  int rx = 50;
  int ry = 50;
  int rwidth = 150; // Breite
  int rheight = 200; // Höhe
  float angle = 0;
  boolean selected = false;

  InteractiveRect(int x, int y, int w, int h) {
    rx = x;
    ry = y;
    rwidth = w;
    rheight = h;
  }

  void draw() {
    pushMatrix();
    if (selected)
      fill(255, 0, 0);
    else
      fill(255);

    translate(rx, ry);

    // rotate around middle
    translate(rwidth/2, rheight/2);
    rotate(angle);
    translate(-rwidth/2, -rheight/2);

    rect(0, 0, rwidth, rheight);
    popMatrix();
  }

  void clicked(int inputX, int inputY) {
    if (rx <= inputX && inputX <= rx + rwidth &&
      ry <= inputY && inputY <= ry + rheight) {
      selected = !selected;
    }
  }

  void update(int pinputX, int pinputY,
              int inputX, int inputY) {
    // Umschalten, falls auf Objekt
    if (rx <= inputX && inputX <= rx + rwidth &&
      ry <= inputY && inputY <= ry + rheight) {
      rx += inputX - pinputX;
      ry += inputY - pinputY;
    }
  }

  boolean isSelected() {
    return selected;
  }

  void incRotation(float d) {
    angle += d;
  }
}
Man beachte die Technik, um um den Mittelpunkt des Rechecks zu rotieren: Zunächst wird das Koordinatensystem zum Mittelpunkt geschoben, dann wird rotiert, dann wird das Koordinatensystem wieder zurückgeschoben, damit die spätere "eigentliche" Translation nicht verfälscht wird.
translate(rwidth/2, rheight/2);
rotate(angle);
translate(-rwidth/2, -rheight/2);
Korrigierte Version
Das Problem ist, dass unsere Kollisionsberechnung oben von einem nicht-rotierten Rechteck ausgeht. Um dies zubeheben, nutzt man aus, dass man die aktuelle Transformation von Processing als Matrix abrufen kann. Von dieser Matrix nimmt man die inverse Matrix, um den Mauszeiger-Punkt in den object space des Rechtecks zu überführen. Im object space können wir dann mit unserer altbekannten Methode prüfen, ob der überführte Mauszeiger-Punkt im Rechteck liegt.
Hier ist die neue Klasse. Die inverse Matrix wird in matrix gespeichert und nur dann neu berechnet, wenn eine Transformation stattgefunden hat.
class InteractiveRect implements InteractiveThing {

  int rx = 50;
  int ry = 50;
  int rwidth = 150; // Breite
  int rheight = 200; // Höhe
  float angle = 0;
  boolean selected = false;
  boolean matrixChanged = true; // matrix must be recomputed
  PMatrix matrix = null; // inverted transformation matrix

  InteractiveRect(int x, int y, int w, int h) {
    rx = x;
    ry = y;
    rwidth = w;
    rheight = h;
  }

  void draw() {
    pushMatrix();
    if (selected)
      fill(255, 0, 0);
    else
      fill(255);

    // translate to target
    translate(rx, ry);

    // rotate around middle
    translate(rwidth/2, rheight/2);
    rotate(angle);
    translate(-rwidth/2, -rheight/2);

    // draw object
    rect(0, 0, rwidth, rheight);

    // recompute matrix
    if (matrixChanged) {
      matrix = getMatrix(); // current transform
      matrix.invert(); // inverted matrix
      matrixChanged = false; // no recomputation next time
    }

    popMatrix();
  }

  void clicked(int inputX, int inputY) {
    if (isInside(inputX, inputY)) {
      selected = !selected;
    }
  }

  // drag object
  void update(int pinputX, int pinputY,
              int inputX, int inputY) {

    // only if mouse on object
    if (isInside(inputX, inputY)) {
      rx += inputX - pinputX;
      ry += inputY - pinputY;
      matrixChanged = true; // recompute inverted matrix
    }
  }

  // rotate object by increment
  void incRotation(float d) {
    angle += d;
    matrixChanged = true; // recompute inverted matrix
  }

  // checks if point is inside object
  boolean isInside(int inputX, int inputY) {

    // only if matrix has been computed
    if (matrix != null) {

      // compute position in object space
      PVector pos = new PVector();

      // multiply matrix with input point
      pos = matrix.mult(new PVector(inputX, inputY), pos);

      return (0 <= inputX && inputX <= rwidth &&
      0 <= inputY && inputY <= rheight);
    }
    else
      return false;
  }

  boolean isSelected() {
    return selected;
  }
}
1.5.1 Rotation (Drag)
Jetzt möchten wir eine Rotation mit einer Drag-Geste durchführen. Dazu müssen wir einen Drehwinkel berechnen. Dieser Drehwinkel betrachtet den Mauspunkt und den vorigen Mauspunkt und berechnet den Winkel relativ zum Zentrum des Objekts.
Im Hauptprogramm verzichten wir auf Selektion, müssen also die Objekte nur zeichnen und updaten:
import java.util.*; Listthings = new ArrayList (); void setup() { size(300, 300); noStroke(); things.add(new InteractiveRect(50, 80, 100, 120)); things.add(new InteractiveRect(180, 50, 70, 50)); } void draw() { background(200); // Alle objekte zeichnen for (InteractiveThing thing: things) { thing.draw(); } } void mouseDragged() { // Erst updaten, wenn Maus gedragt for (InteractiveThing thing: things) { thing.update(pmouseX, pmouseY, mouseX, mouseY); } }
Die interaktiven Objekte berechnen immer das Zentrum, um welches ja dann gedreht wird. Da wir in beide Richtungen drehen wollen, können wir die Methode angleBetween nicht verwenden.
interface InteractiveThing {
  void draw();
  void update(int pix, int piy, int ix, int iy);
  void incRotation(float angle);
}

class InteractiveRect implements InteractiveThing {

  int rx;
  int ry;
  int rwidth; // Breite
  int rheight; // Höhe
  int cx; // center x
  int cy; // center y
  float angle = 0;
  boolean matrixChanged = true; // matrix must be recomputed
  PMatrix matrix = null; // inverted transformation matrix

  InteractiveRect(int x, int y, int w, int h) {
    rx = x;
    ry = y;
    rwidth = w;
    rheight = h;
    cx = rx + rwidth/2;
    cy = ry + rheight/2;
  }

  void draw() {
    pushMatrix();

    fill(255);

    // translate to target
    translate(rx, ry);

    // rotate around middle
    translate(rwidth/2, rheight/2);
    rotate(angle);
    translate(-rwidth/2, -rheight/2);

    // draw object
    rect(0, 0, rwidth, rheight);

    // recompute matrix
    if (matrixChanged) {
      matrix = getMatrix(); // current transform
      matrix.invert(); // inverted matrix
      matrixChanged = false; // no recomputation next time
    }

    popMatrix();
  }

  // drag object
  void update(int pinputX, int pinputY,
              int inputX, int inputY) {

    // only if mouse on object
    if (isInside(inputX, inputY)) {

      // this does not work because angleBetween results
      // in positive angles ALWAYS
      /*
      PVector v1 = new PVector(pinputX - cx, pinputY - cy);
      PVector v2 = new PVector(inputX - cx, inputY - cy);
      float alpha = PVector.angleBetween(v1, v2);
      println(alpha);
      */

      // use this instead
      float alpha1 = atan(float(inputX-cx) / (inputY-cy));
      float alpha2 = atan(float(pinputX-cx) / (pinputY-cy));
      float alpha = alpha2 - alpha1;

      incRotation(alpha);
    }
  }

  // rotate object by increment
  void incRotation(float d) {
    angle += d;
    matrixChanged = true; // recompute inverted matrix
  }

  // checks if point is inside object
  boolean isInside(int inputX, int inputY) {

    // only if matrix has been computed
    if (matrix != null) {

      // compute position in object space
      PVector pos = new PVector();

      // multiply matrix with input point
      pos = matrix.mult(new PVector(inputX, inputY), pos);

      return (rx <= inputX && inputX <= rx + rwidth &&
      ry <= inputY && inputY <= ry + rheight);
    }
    else
      return false;
  }
}
1.5.2 Translation und Rotation (Zonen)
Um Translation und Rotation zu kombinieren und beides mit Maus-Drag zu steuern, kann man Zonen einführen. Im Zentrum würde man Translation ansiedeln, am Rand des Objekts eher Rotation, da sich am Rand präziser rotieren lässt (gern mal im obigen Code ausprobieren nahe des Zentrums zu rotieren, wo eine kleine Änderung eine starke Rotation auslöst).
Zur Verdeutlichung zeichnen wir die Translationszone ins Objekt:
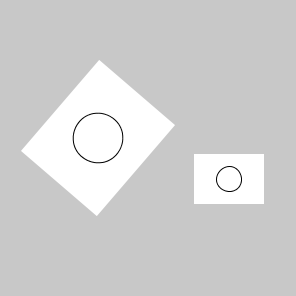
In der Klasse kommt hinzu der Durchmesser des Translationskreises (Hälfte von Breite oder Höhe, was kleiner ist).
interface InteractiveThing {
  void draw();
  void update(int pix, int piy, int ix, int iy);
  void incRotation(float angle);
}

class InteractiveRect implements InteractiveThing {

  int rx;
  int ry;
  int rwidth; // Breite
  int rheight; // Höhe
  int cx; // center x
  int cy; // center y
  float centerCircleDia;
  float angle = 0;
  boolean matrixChanged = true; // matrix must be recomputed
  PMatrix matrix = null; // inverted transformation matrix

  InteractiveRect(int x, int y, int w, int h) {
    rx = x;
    ry = y;
    rwidth = w;
    rheight = h;
    cx = rx + rwidth/2;
    cy = ry + rheight/2;
    centerCircleDia = min(rwidth, rheight)/2;
  }

  void draw() {
    pushMatrix();

    fill(255);

    // translate to target
    translate(rx, ry);

    // rotate around middle
    translate(rwidth/2, rheight/2);
    rotate(angle);
    translate(-rwidth/2, -rheight/2);

    // draw object
    rect(0, 0, rwidth, rheight);

    // draw circle
    stroke(0);
    ellipse(rwidth/2, rheight/2, centerCircleDia,
            centerCircleDia);
    noStroke();

    // recompute matrix
    if (matrixChanged) {
      matrix = getMatrix(); // current transform
      matrix.invert(); // inverted matrix
      matrixChanged = false; // no recomputation next time
    }

    popMatrix();
  }

  // drag object
  void update(int pinputX, int pinputY,
              int inputX, int inputY) {

    // only if mouse on object
    if (isInside(inputX, inputY)) {

      // compute distance from center
      float dist = dist(cx, cy, pinputX, pinputY);
      if (dist < centerCircleDia/2) {
        // do translation near center
        move(inputX-pinputX, inputY-pinputY);
      }
      else {
        // do rotation on periphery
        float alpha1 = atan(float(inputX-cx) / (inputY-cy));
        float alpha2 = atan(float(pinputX-cx) / (pinputY-cy));
        float alpha = alpha2 - alpha1;
        incRotation(alpha);
      }
    }
  }

  // rotate object by increment
  void incRotation(float d) {
    angle += d;
    matrixChanged = true; // recompute inverted matrix
  }

  void move(int dx, int dy) {
    rx += dx;
    ry += dy;
    cx = rx + rwidth/2;
    cy = ry + rheight/2;
    matrixChanged = true; // recompute inverted matrix
  }

  // checks if point is inside object
  boolean isInside(int inputX, int inputY) {

    // only if matrix has been computed
    if (matrix != null) {

      // compute position in object space
      PVector pos = new PVector();

      // multiply matrix with input point
      pos = matrix.mult(new PVector(inputX, inputY), pos);

      return (0 <= inputX && inputX <= rwidth &&
      0 <= inputY && inputY <= rheight);
    }
    else
      return false;
  }
}